Tuesday, May 14, 2013

Morel Mushrooms!

One of my childhood memories of springtime is mushrooms! Not just any mushroom (although back then we knew of no others) but morel mushrooms, those special little morsels that Dad could find in the woods by simply pushing back a few dead oak leaves, picking them and plopping them in his sack. Some years he would find bunches of them, other years not so many. Dad loved to be outside, farming, fishing, and walking in the timber. My farmer brothers have acquired these habits as well, with one brother fishing every chance he gets and the other walking in the woods and noticing every wonder growing there. 

Today happened to be an excellent day with foods supplied by these brothers of mine. I had fish caught by Dennis for lunch and mushrooms found by Doug for supper! How about that!

Doug's morels!

Step 1 . . .

Gotta get rid of the dirt and bugs! So, put a tablespoon or so of salt in a bowl of water and add the mushrooms. 
Swish them in the salted water and you will see
dirt and maybe even a bug or two. 

Step 2 . . .

There is usually more than one way of doing things. This is how I prepared my mushrooms today, but there are other possibilities. 

While the mushrooms are soaking, prepare the breading. Put flour in one bowl and season with some salt, pepper and garlic powder. Crack an egg into another bowl and mix it up with a fork or a whisk. Put Panko breadcrumbs in bowl number 3. Now you are ready to drain the mushrooms, cut in half, and blot dry with paper towel.


Flour, beaten eggs, panko breadcrumbs

Next, bread the mushrooms . . .

Breading, simply means covering the food with crumbs for a crispy delicious coating. You want the crumbs to stick and eggs are the trick for this. 

First dredge the mushrooms in the seasoned flour, then dip them into the egg mixture and finally into the crumbs. Put the breaded mushrooms onto a cookie sheet or a plate until ready to fry. 


And finally, here they are breaded and ready to fry. All those wonderful crumbs will fry up crispy and delicious.


Time to fry . . .

I like a heavy skillet, a combination of oil and butter, and just below medium heat. Give the skillet a few minutes to preheat and you are ready to go.

When the butter is melted and the skillet is hot add the mushrooms. You should hear the sizzle of frying when the mushroom hits the skillet. If the first one doesn't sound off, wait till you hear it before adding the others. Do not crowd the skillet and flip each one over as it turns golden brown. You will need to add a little more fat with each batch fried.
Please pardon the glare, but look at that wonderful golden crust!
Once the mushrooms are golden on both sides, remove to a plate, continue frying, then enjoy these seasonal delights! This, my friends, was my entire supper this evening. If you want the truth, there were a few more as I took this photo while the last ones were still frying. There aren't many foods worthy of becoming an entire meal. In the summer I might eat nothing but corn for a meal or two and sometimes on a wonderful lazy Sunday popcorn might be my entire evening meal and in the spring, on a good year with the generosity of a brother, morels can join this select group of foods. Yum, yum!


And now for a bit of science just because I can . . .

I like a little flour for the first step of the breading process to absorb any lingering moisture. The egg can be diluted with a little water or milk, but don't get it too runny. The proteins in the egg stick together as they are heated and that is what "glues" on the crumbs. If there is too much added water, steam will be produced and that will make the coating more soggy and tough rather than crisp and crunchy. 

I like the crispiness of Panko breadcrumbs, but you can use cracker crumbs, breadcrumbs, or many other dry crunchy foods. Experiment with possibilities like cereal, potato flakes or whatever your neighbors, family and friends insist is the best. 

The flavor of butter is great, but it has a low smoke point, so temper it with some oil for best results. Oil without the butter is also perfectly acceptable, but butter alone will burn, even at medium heat. So if you really want to use only butter, keep the heat LOW.

I use as little fat in the skillet as possible, because it all seems to be absorbed into the crumb coating. There is a fine line between too little and enough. Not enough will yield a white crust rather than golden. 

This basic process can be used for frying lots of different foods. Other vegetables can be fried in this manner. Shrimp is delicious, too. I don't fry foods often, but when I do, I want it golden, crunchy and flavorful! Don't be afraid to give it a try, but not to often, please! 


Saturday, May 11, 2013

Baking In My New Kitchen

Who knew Mrs. Clark would be moving into her new house on the day that it snows in May! Always an adventure, but now I am here, unpacking and feeling right at home. My kitty seems to have adjusted as well as I am and my girls feel at home here, too. It is home because we are here. It is home because I brought my favorite things and it is home because all of our memories of Sam came with us. Although my girls no longer live here, there is a place for them and when they are here it feels like we are at home and that is a very good thing. 

Graduation Season

Today was my first graduation party. Part of my standard graduation gift is a little bag of my favorite chocolate chip cookies along with the recipe, all tied up with a bit of ribbon. So today, I baked my first batch of cookies in the new oven. I now have an electric range when I have always had gas at the old house. My classroom had electric ranges so I am not completely unfamiliar. In a perfect world I would be cooking on gas and baking with an electric oven. Since I seem to have a long history of making do, I am just fine with now using electric and this one seemed to bake these cookies just right! Yippee!

Here's the cookies I baked earlier today.

Mrs. Clark's Favorite Chocolate Chip Cookies

1 cup butter
1/2 cup shortening
1 1/4 cup sugar
1 1/4 cup brown sugar
1 Tablespoon vanilla
2 eggs
4 1/4 cup flour
2 teaspoons baking soda
1 teaspoon salt
12 oz. semisweet chocolate chips

Preheat oven to 350 degrees. 

Using electric mixer, cream together butter, shortening and sugars in large bowl until thoroughly combined. Add eggs one at a time mixing completely after each. Add vanilla.

Sift together dry ingredients and add to creamed mixture, stirring slowly until completely  combined. Stir in chocolate chips. 

Drop dough by rounded teaspoons about 2 inches apart onto ungreased cookie sheet. Bake 9-10 minutes until edges of cookies are set but centers are still soft. Allow to cool several minutes on cookie sheet before removing. Allow to completely cool before storing in air tight container. 

A few things I have learned along the way . . .

A little shortening in cookies adds a chewy texture. Butter gives flavor and a crisp texture so the mix of both is wonderful. No two margarines are the same, so you might get inconsistent results if you use margarine instead. If you insist on using it, you will have to experiment with different brands to find what works. I can't insure the outcome of this recipe except with butter and shortening. 

Be sure to completely mix the fats and the sugars; get it nice and fluffy before adding the first egg. Do not try to save time by adding both eggs at the same time. They will absorb much better one at a time. 

Take time to sift the dry ingredients. At the very least measure them into a bowl and stir them together with a wire whisk. Sifting or whisking will add some air as well as getting those small amounts distributed throughout the flour. 

Speaking of flour, before you even measure it, take a big spoon and fluff it up in your bag or canister. Then gently spoon it into the measuring cup and level it off. Do not settle it or pack it into the cup as that will actually add too much flour to your dough, making your cookies tough and dry. Nobody wants that!

The recipe calls for semisweet chips, but I have used dark chocolate and I have also used milk chocolate chips. Each tastes a little different, but I like them all. I have never met a chocolate chip I didn't like, but please do not buy the ones labeled "chocolate flavored chips". Use the real deal, whatever brand you like. 

I use a cookie scoop, but you can scoop the dough onto one spoon and push it off onto the pan with another spoon. I always put 12 cookies on the pan, three across in four rows. I usually get about 60 cookies.

The recipe says the pan should be ungreased, but I always line with parchment paper. Clean up is a breeze and the cookies never stick. Do not spray or grease the pans. The cookies are likely to spread on a greased sheet. 

Now, whatever you do, do not over bake! Bake only until the outside edge begins to firm up. The center will still be soft and un-done, but it will finish baking on the cookie sheet. I take the pan out of the oven and set it on top of the stove. Just before taking out pan number two, I remove the first cookies to a sheet of wax paper on the counter. 

I bet that was more than you ever wanted to know about baking cookies! Happy baking!

As long as we are talking about sweet treats . . .

Here's something Rachel taught me about. She found it in Iowa City and I had some at her house. Oh, golly, it was good!


Oh, my goodness! I have no business knowing how delicious this ice cream tastes! Let me tell you, when I saw it at our local Hy-Vee and that little carton jump into my cart I knew I had a new guilty pleasure. There are many delightful looking flavors and I have only tried 2, but I think by the end of summer I might have experienced a few more. 

I believe the name of this creamy yummy-ness is 2nd Street Creamery, but since the carton is no longer in my freezer I can't go look for sure. The ice cream is very creamy and smooth and it is chock full of whatever topping and candy is added into it. I highly recommend you give it a try when you are looking for a special little treat.

Next blog will be about something more healthy, but equally delicious!

One Last Thing . . 

Happy Mother's Day one and all. I had a wonderful mother, who I miss very much. I loved her yet she drove me crazy at times. She was such a character! She never knew a stranger and loved to talk to anyone. She was a champion promoter of our little community. She loved God, her family, her garden and good food. I learned about the power of food and the wonders of family around the table from her. She had a huge appetite and ate more than my Dad on a regular basis. I just wish I had been blessed with her metabolism instead of only her appetite! I miss her, but I know she is having a blast in heaven! 

Thursday, March 14, 2013

Fajitas

Long Time, No Write

Mrs. Clark has been absent from the kitchen! Well, not exactly, but absent from writing. Mrs. Clark has been waaaay to distracted lately by basketball games and the sort and pitch process that is leading to an upcoming move to a newer house. However, the time has come to put forth some food thoughts, so here goes.

I had a wonderful opportunity to write about the delicious stir-fry I made with friends this evening, but I was so enthralled with eating it that I completely forgot to take pictures. So, what to write about? Well, it is Pi Day so maybe I should write about pie. No, holding to the "distracted" theme, I think I will write about something completely random, yet one of my favorite foods, Fajitas! I like these with chicken or beef and loads of flavorful veggies.

Beef Fajitas

Beef or Chicken Fajitas

Serves 4
8 flour tortillas (7 inch)
1 Tbsp. lime juice
½ tsp. ground cumin
½ tsp. ground coriander
¼ tsp. dried oregano
¼ c. Italian salad dressing (not reduced fat)
1 red, green or yellow pepper, cut into strips
1 small onion, halved and sliced

1 lb. skinless, boneless chicken breast, thinly sliced into bite size pieces 
or
1 lb. sirloin steak, thinly sliced into bite size pieces


shredded cheese
salsa
sour cream

1.  Wrap tortillas in foil; heat in a 350 degree oven for 10-15 minutes or until heated through.

2.  Meanwhile, in a medium bowl combine lime juice, cumin, coriander, and oregano.  Stir in chicken or beef.

3.  Pour salad dressing into a large skillet.  Preheat over medium high heat.  Add meat mixture.  Stir-fry for 2 minutes.  With a slotted spoon, remove meat from skillet.  Add pepper and onion to empty skillet and stir-fry for 2-3 minutes or until crisp-tender.  Return meat to skillet; heat through.

4.  Spoon mixture onto warm tortillas; roll up.  If desired, top with cheese, sour cream, salsa.

A little bit more . . .

I always do the prep work first, before I even begin with the instructions below the recipe. What do I mean by prep work? All the cutting directions in the ingredient list. So, I juice half of a lime, cut the pepper, the onion, and the meat. By the way, I prefer to use part of a green pepper and part of a red or yellow one. It gives a little more color variety and just plain tastes good, too. If there is only a green pepper on hand then that is what I use. 

Now, I am ready to proceed to wrapping the tortillas and popping them in the oven before seasoning the beef or chicken. Cumin and coriander provide a little smokey flavor and really create a wonderful aroma in your kitchen. 

Here's where this recipe changes it up just a little. The meat or chicken is cooked in a bit of Italian dressing instead of oil. The dressing is oil, but it gives some great flavor. If you have Italian dressing in your fridge, use it. If not, you can use oil, or you can mix a little oil with some lemon or lime juice and use that. Cook the chicken till there is no more pink. If it is cut in thin strips, it won't take long at all. If you are using beef, a little pink can remain. 

Once you remove the meat, add the veggies and cook quickly, just until they begin to soften. Do not overcook. Drop the meat back into the skillet. Cook and stir, just to get everything combined.

You might have noticed the above fajitas pictured also contain some tomatoes. Everything is just a little bit better with a tomato, if you ask me! I add the tomatoes at the very end of cooking the veggies. Don't cook as long as the other veggies or they will turn way too soft and juicy.

Bring it all to the table with the tortillas and enjoy! You have a nice amount of veggies, some nice lean meat and with a whole grain tortilla or two you have a very nutritious and speedy dinner. It is always a winning combination which makes me smile.

A little more fun . . .

Look what my friend Pam made last week and brought to a fun event. Do you see the pot of gold at the end of the rainbow? You might have to stand on your head or flip your computer upside down!

Strawberries, mandarin oranges, pineapple, green grapes, blueberries and a purple grape, too.
The yummy dip is simply a jar of marshmallow cream mixed into an 8 ounce package of cream cheese. Yes, every rainbow needs a bit of a cloud. 

A bit of refreshing fruit like this would be very nice along side the fajitas.


Thursday, February 21, 2013

Chicken Cordon Bleu And A Bonus Recipe, Too.

Chicken Cordon Bleu might sound intimidating, but believe me, it isn't. Simply put it is chicken stuffed with ham and cheese, which is a very nice combination. The presentation is on a dinner party level, but it is easy enough to make for a family dinner. Once you have made this a time or two you won't even need to refer to the recipe; you can just assemble a few ingredients and cook! So, let's get on with it . . .


Chicken Cordon Bleu

6 boneless skinless chicken breast halves
6 slices Swiss cheese
12 thin slices deli ham
2 eggs, beaten
3 Tbsp. flour
1 tsp. paprika
3 Tbsp. olive oil
3 Tbsp. butter
1/2 cup chicken broth
1 Tbsp. cornstarch
1 cup heavy cream

Preheat oven to 350 degrees. Pound chicken breasts to 1/4" thick. Place ham and cheese on chicken. Roll up and secure with toothpicks.

Heat butter and olive oil in large skillet over medium heat. Dip each roll in egg, then roll in flour mixed with paprika. Cook until all sides of chicken are lightly browned. Transfer chicken to a 9" x 13" baking dish.

Combine cornstarch with heavy cream, then add chicken broth. Add to drippings in the skillet and cook until slightly thickened. Pour over chicken. Cover. Bake 20-25 minutes until chicken juices run clear.

Pull out the toothpicks before spooning sauce over chicken rolls to serve.


A Little Cooking Lesson . . .

Do not skip the pound the chicken step! I use a meat mallet, but if you don't have one you can use the heel of your hand, a skillet or even a rolling pin. The idea is to smack it until it is thin and flat and is much more spread out. Do not pound holes into the chicken just get it thin and flat. It should be somewhere between 1/8" and 1/4" thick. 

Lay the 2 slices of ham out overlapping and put the cheese slice in the center. Now fold the edges over to enclose the cheese. Place the wrapped cheese in the center of the flattened chicken and fold the sides of the chicken over the ham/cheese slice then roll from one end to the other. The ham/cheese should be enclosed completely. Now use a couple of toothpicks to hold this all together. You could also tie it with string if you would rather, but I find the toothpicks work well. Repeat for all 6 chicken breasts.

Heat the butter and the olive oil:  using the two together is perfect! Butter gives a fantastic rich flavor, but used alone it will burn. The olive oil has a much higher smoke point and tempers the butter so used together you will get the flavor of the butter without it browning too much. How nice!

Put the beaten eggs in one bowl and mix the flour and paprika in another. Dip first in the egg, then in the flour. The egg sort of glues on the flour. Don't crowd the skillet. Give the chicken some room to breathe as they brown. Doing 3 at a time is better than shoving them all in on top of each other. These will not be cooked through, simply browned on the outside to develop some flavor. 

After pouring the sauce over the chicken rolls be sure to cover the dish. If your dish doesn't have a cover, use some foil, but covering will keep it all nice and moist. 

Oh, such a yummy chicken dish! Serve it along with a nice green salad, and your choice of rice, potato or bread. Add a beverage and some great company at your table and you have a dinner to savor.

Bonus Recipe!

This is an add on because I don't want to forget about it! The last time I had dinner with some great friends one of their children requested deep fried shrimp. Since I hadn't made this for years and years, maybe never, actually, I had to go on a recipe hunt and oh, boy, I found a good one! Japanese Style Deep Fried Shrimp.

You can find the recipe here and follow the directions. In honor of Fish Fry Lenten Fridays, try this recipe! I can hardly wait for a reason to make it again.


For this dish, put the flour in one bowl, the eggs in the second bowl and the bread crumbs in the third bowl. The flour first dries up the shrimp so the eggs will stick. The eggs then glue on the bread crumbs. It all works so nicely! Be sure to use the Panko style bread crumbs for the most crunch. 

Always enjoy good food!


Sunday, February 17, 2013

Fruit Salad

Today's post was inspired by a simple question from my son-in-law, Kyle, who asked me how I cut the orange in the fruit salad so there was none of the tough membrane on the sections. With the help of some photos, I'll attempt to show you how I cut some of my favorite fruits. First things first, here's the recipe for my all time favorite fruit salad . . .

Fruit Salad

1/3 cup sugar
2 tsp. cornstarch
2/3 cup orange-pineapple or pineapple juice
1/2 tsp. vanilla
1 pineapple, cut into tidbits
1 quart strawberries, stemmed and sliced
4 red apples, cored and cut into bite size pieces
2 cups green grapes, cut in half
4 firm bananas, sliced

To make dressing, combine sugar and cornstarch in a small saucepan. Stir in juice. Stir constantly while cooking over medium heat until mixture slightly thickens and comes to a boil. Remove from heat and add vanilla. Cool completely.

Combine all fruits in a large bowl and add cooled dressing. Stir to combine. Enjoy with a large group of people.

Details, Details, Details . . .

 Don't forget, this recipe is a guideline! I vary the fruits with the season or with whatever whim I am experiencing at the moment. Remember how this all started with a question about cutting an orange? The salad at that moment had at least one orange and probably a kiwi or two and maybe no apples. Use what you like! I almost always use pineapple because I almost always want it; the same with strawberries and bananas, but the other stuff might change. Grapefruits are good, so are blueberries and even raspberries.  

Now For the Tuity-Fruity, Nitty Gritty . . .

Wash pineapple, then cut off both ends.


Stand up the pineapple and cut into quarters.
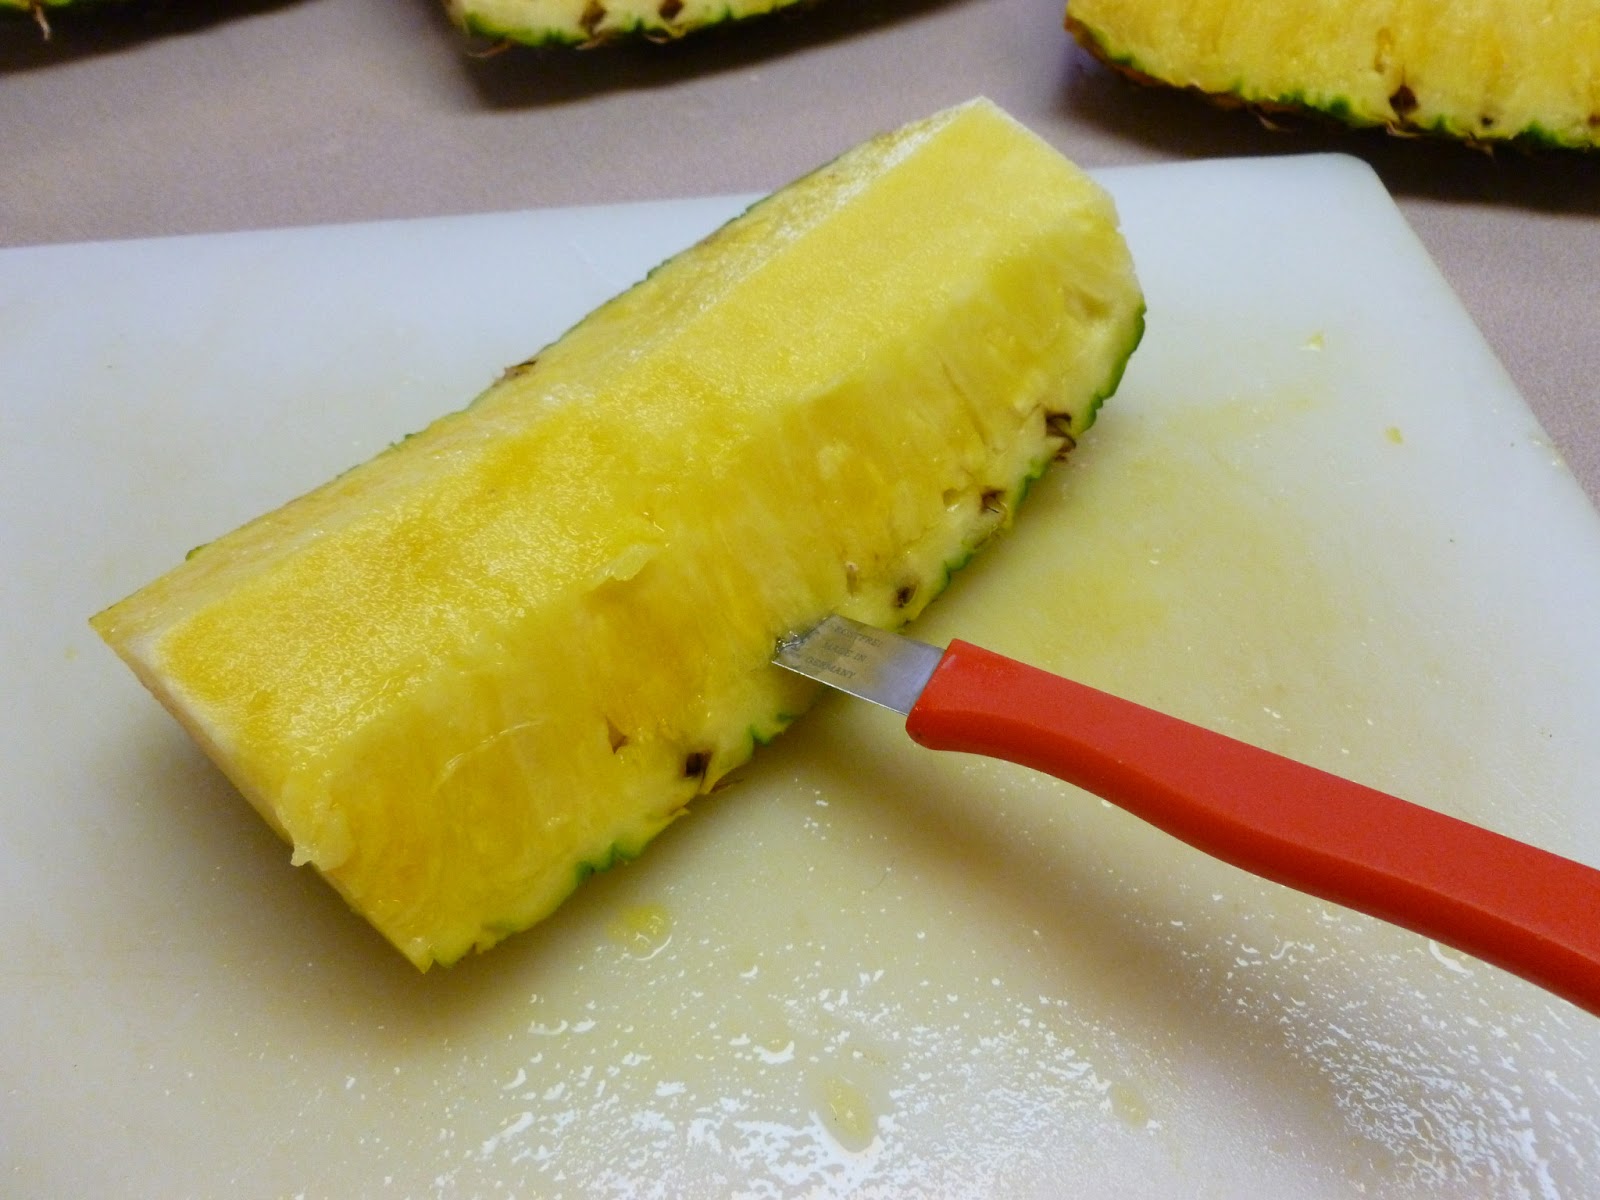
Trim off the tough core in the center of each piece.
Cut pineapple away from the outside peel of each piece.


Cut along each side and the end.
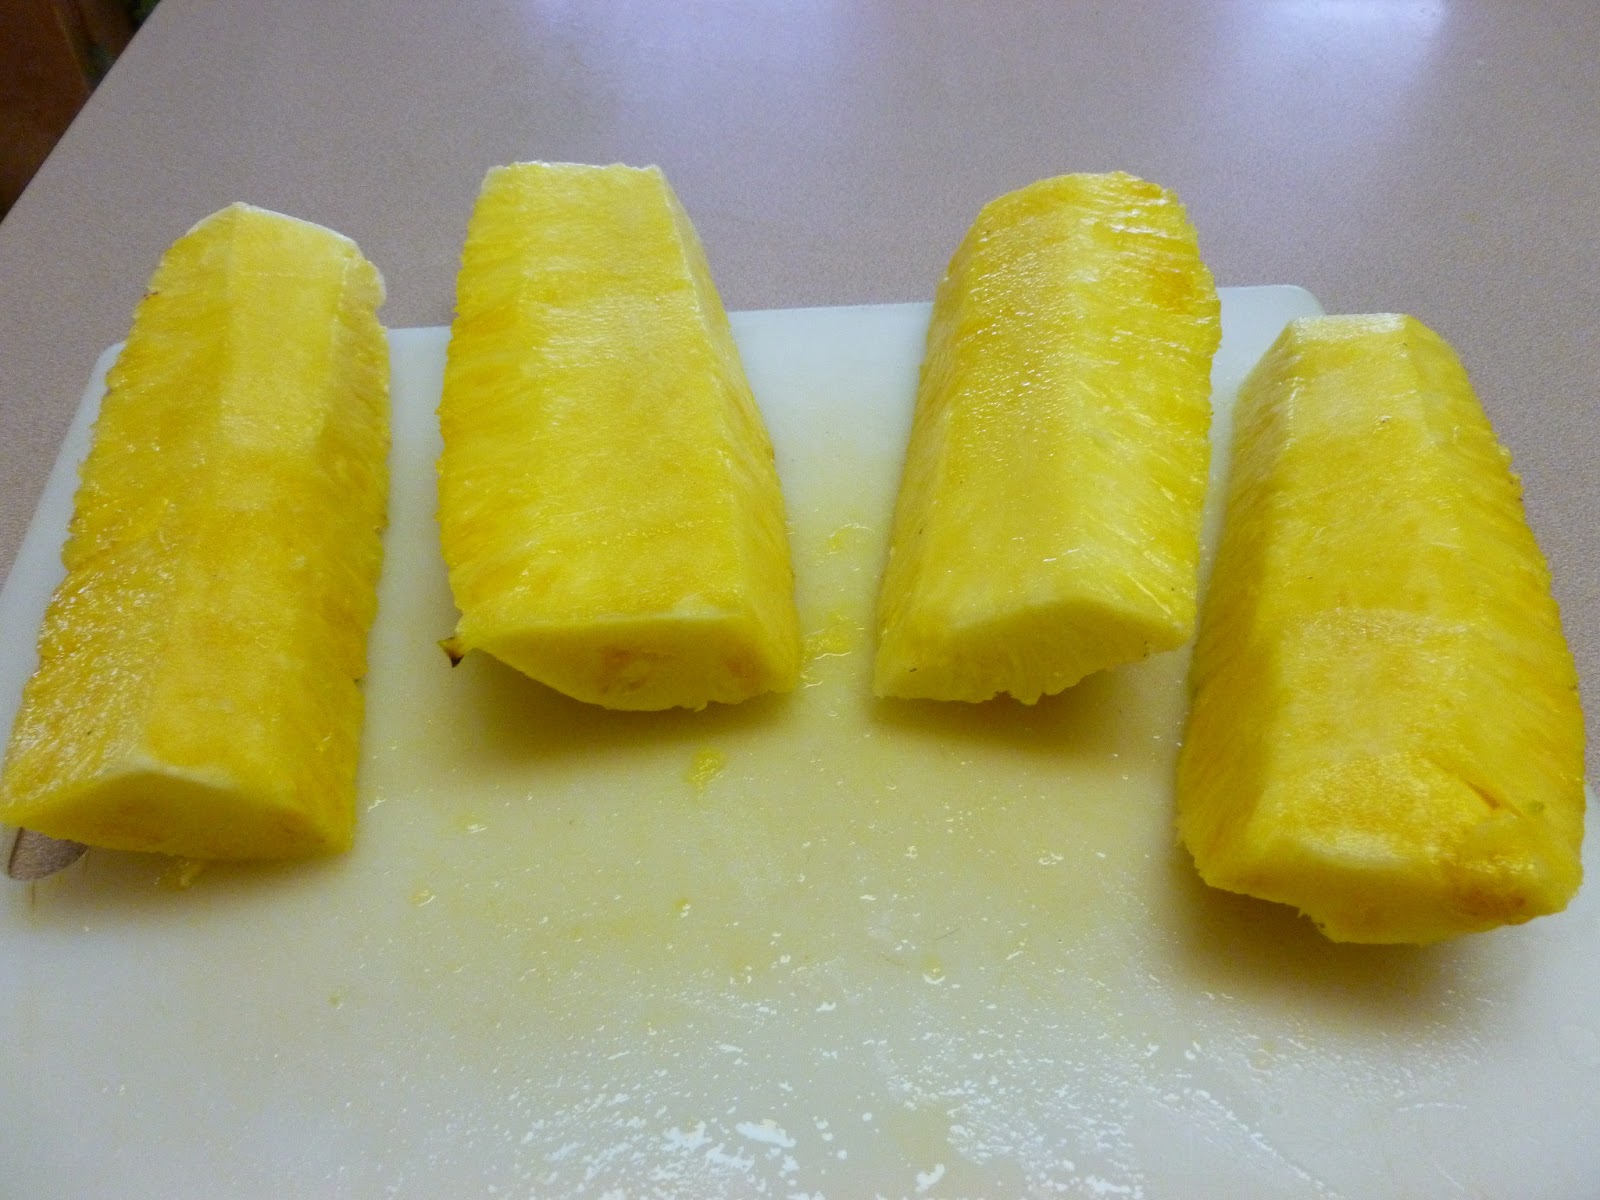
Do the same with all four pieces.
Cut each section into four long spears.
Turn sideways and cut the spears into small chunks or tidbits.
Look at all the beautiful yummy juicy pineapple!

     And the kiwi . . .

Wash the kiwi. Use a paring knife to remove the stem.


Use the peeler to remove the skin. Handle gently!
Use egg slicer (or paring knife) to slice the kiwi.

Luscious green fruit!

 Now for that orange . . .

A paring knife is all you need.
Cut off both ends of the orange.
Use the knife to cut off the peel from top to bottom.
Cut the sections away from the tough membrane by cutting right next to the membrane down to the center of the orange. Leave the knife in and twist it gently. It "should" sort of pop the section away from the membrane on the other side. Repeat with each section of the orange. 

This technique is a little easier to practice on a grapefruit because the sections are a bit bigger. After you do it a couple of times it is easier to do. Give it a try! Do not be intimidated by a little orange!

Just a little more info . . .

I buy the juice in 6-packs of little cans, found in the juice isle at our local stores. Each can is just the right size for the recipe. Don't measure, just use the whole can.

This recipe makes enough salad for Thanksgiving dinner, but if you want it for a smaller crowd the leftovers are still good the next day. The bananas are a little mushy on day two, but everything is still tasty. However, it is easy to prepare the amount of fruit you want and only use part of the dressing. The rest of the dressing will keep for at least a couple of weeks in a jar in your fridge. 

Dear reader, if you were in my Foods 2 class at NHS in this century (maybe even before), you had this salad on Salad Lab day and you probably enjoyed it then. It was one of the all time favorite, most asked for recipes. I probably made more copies of this recipe than even the Cinnamon Roll or Chocolate Chip Cookie recipes.

I hope you enjoy this recipe as much as I do. My family, many family friends and the After School Club at church have also enjoyed this over the years. It is time tested and worth passing around.


Sunday, January 27, 2013

My Favorite Oatmeal Cookies

This is a wonderful chewy oatmeal cookie recipe which came from my mom. I had not used it for so long that I didn't even realize I had the recipe! My California sister, Karla came to visit with a box of the most delicious Oatmeal Cookies. She seemed a bit astonished that I didn't have Mom's recipe and she shared it with me. Lo and behold, the very last recipe in the cookie section of my box was the same exact recipe, complete with "MOM" written in the corner. It has been one of my cookie regulars ever since.


Mom's Oatmeal Cookies

1 c. sugar
1 c. brown sugar
3/4 c. butter
2 eggs
1 tsp. vanilla
1 tsp. baking soda
1/2 tsp. salt
1/2 tsp. baking powder
1 1/2 c. flour
3 c. quick oats

Thoroughly cream together the sugar, brown sugar and butter until light and fluffy. Beat in eggs one at a time. Add vanilla.

Sift together the dry ingredients and add to the mixture. Add the oats and stir in.

Form into balls and roll in sugar before placing on baking sheet. Bake at 350 degrees for 7-9 minutes or until cookies are set around the edges, but still soft in the center. Cool on baking sheets until cookies are firm. Remove and cool thoroughly before stacking.

Make Them Even Better . . .


A friend gave me a bag of Caramel Bits. I had never seen these and neither had she until she found them listed in a recipe. She got to investigating and found them online when they were not to be found locally. She ordered a case and I reaped the benefit of a bag. I added them to the cookies pictured above and oh, boy, they were a winner. I may have to order my own case of Caramel Bits!

Another of my favorite add ins is Cinnamon Chips. They are not always available either, but I usually buy them locally in the fall and this year all the way through the holiday season. I often add a teaspoon of cinnamon along with the dry ingredients, too.

My sister Karla makes them with dried blueberries and they are incredibly good with some of the hickory nuts that our Dad used to pick up in the timber and shell out in his spare time in the winter. I wonder if he knows how much we miss his hickory nuts. I still have one box in the freezer and I eat one or two pieces every now and then. They are way too precious to even put in cookies. 

If you add in any of these items or your own favorites, just stir them in with the oats.

I usually don't roll in balls, I use my medium cookie scoop. That is close enough to a ball for me. I roll the rounded side in sugar and plop down the flat side.

I Always Use These


My nearly ancient sifter and parchment paper are my friends! I believe in the benefits of thoroughly combining the dry ingredients, but sifting also adds air to the mix. So, if you don't have a sifter at least whisk or stir your dry ingredients in a bowl before adding. Also, measure those dry ingredients carefully! Spoon the flour into the cup and level it off. Please don't scoop the cup into the flour and fill it up. It puts more flour into the cup than the recipe is formulated to use. Cookies will be softer, chewier, and more moist if everything is measured carefully. 

Lining the baking sheets with parchment paper keeps the cookies soft and golden. It also makes clean up a breeze. Tear off a piece of parchment for each cookie sheet, just the size of the sheet. 

Completely Unrelated But I Just Can't Help Myself . . .


My other sister, Pam and her husband Jim gave me these sweet Bear Paw Meat Handling Forks for Christmas. They look a bit dangerous and I think that is why they work so well! They do damage in a similar manner as the real deal might work. I shredded these 6 chicken breasts in just a few minutes. It would have taken a LOT longer to use a fork, trust me! I think they got them at Cabella's, but I bet you can find a nifty pair online while you are looking for the Caramel Bits!

Happy hunting and as always, I wish you good food!


Friday, January 11, 2013

Spaghetti Squash Casserole

Vegetables, vegetables, vegetables! I can't really think of one I don't like and I am always looking for new ways to prepare them. This squash shreds apart into spaghetti like strands once it is baked, hence the name. I have always found it tasty when served with pasta sauce and parmesan cheese. The taste and texture are different than pasta, but it is delicious none the less.


A while back a friend shared a recipe for a Spaghetti Squash Casserole and you can find that recipe if you click on this link

I was had my squash ready . . .


. . . but I found myself without an item, so here's my version of that recipe.


Spaghetti Squash Casserole

1 spaghetti squash, halved lengthwise and seeds removed
1 small onion, chopped
2 cloves garlic, chopped
1 tsp. dried basil
1 tsp. water
1 1/2 cups spaghetti sauce, divided
1 cup lowfat 1% cottage cheese
1/2 cup lowfat shredded mozzarella cheese
1/4 cup chopped parsley
1/4 tsp. salt
1/4 cup grated parmesan cheese
1/4 cup panko bread crumbs

Preheat oven to 400 degrees. Line a baking sheet with parchment paper. Place the squash cut side down on parchment and bake for 30 minutes or until tender when pierced with a sharp knife. With a fork, scrape the squash strands into a large bowl.

Meanwhile, place the onion, garlic, basil and water in a small bowl and cover with wax paper. Microwave for 2-3 minutes or until tender.

To the bowl with the squash, add 3/4 cup of the spaghetti sauce, the cottage cheese, mozzarella, parsley, salt and the onion mixture. Stir to mix. Transfer into baking dish. spread with remaining spaghetti sauce and sprinkle with parmesan cheese and bread crumbs. Bake 30 minutes or until bubbly and heated through. Yield: 6 servings.

I Can't Leave Well Enough Alone

The hardest part of cooking spaghetti squash is cutting it in half. So, I usually poke it a few times with a fork; just get the fork through the hard skin. Put it in the microwave for 5 minutes to start the cooking and slightly soften the squash. Then I can more easily cut it in half, scoop out the seeds and continue the oven baking process. If your squash is large it will take longer than 30 minutes to bake. Bake it until a sharp knife goes in easily or until it yields to pressure when you poke on it.

This recipe turned out cheesy and satisfying. I really like the crunch on top. I served it with a piece of tilapia which I cooked on the George Foreman and I added a big salad, even more vegetables. Delicious dinner on a chilly winter night. 


More Food Fun . . .

Yesterday evening I had a fun experience of making some tamales to celebrate a young friend's 13th birthday. His Mom and I seem to think we can do about anything and we drag her children willingly into the fray. We had 5 kids of varying ages and 2 adults with their hands in the dough and wrapping the corn husk packages. The birthday celebration included our tamales with Mexican Rice and green salad. Dessert happened to be brownies and ice cream. Look forward to my next post which might just be the recipe for the brownies.