Thursday, September 20, 2012

Kitchen Fun Tonight!

I need a kid friendly dessert for a family event on Sunday. I was in the mood to try something new so I went searching on one of my favorite recipe sites, Allrecipes.com where I found Peanut Butter Sandwich Cookies. What kid wouldn't like that? I'm thinking most adults would like that, too! After all, what's not to like about peanut butter or sandwich cookies? So, putting them together is bound to be a winner. I noticed this recipe has 4 1/2 stars out of 5 and lots of reviews, which I quickly perused and decided this one was worth a try.

My finished cookies! Success!

You, too, can find this recipe by clicking here.  

I made the recipe as written with one change. The recipe as written calls for 1 cup of shortening. I used 1/2 cup shortening and 1/2 cup butter. I'm sure all shortening would have been good, too. 

I used my smallest cookie scoop to make the balls, so they would all be similar in size. Since this is a two cookie serving I wanted the single cookies to be small. 

Dip your fork in sugar to keep it from sticking as you flatten the cookies.

Do not over bake! I baked for 6 1/2 minutes and watched them closely. As soon as they began to turn golden I yanked them out of the oven and let them rest on the hot pans for a couple of minutes as the next pan went into the oven. 

When frosting the cookies, put a dollop in the center of the flat side of one cookie, and top it with another cookie putting the flat sides together and gently pushing them together to spread out the frosting. 

As I was making the sandwiches I thought chocolate frosting would be mighty tasty, so part way through I added 1 tablespoon of baking cocoa to the frosting and made the remainder peanut butter chocolate sandwich cookies. Yum! 

Can you see the two different frosting fillings?
I predict that these cookies will be a hit with kids of all ages! They are flavorful and chewy. I will keep them nice and soft by putting a slice of bread in the plastic container with the cookies. 

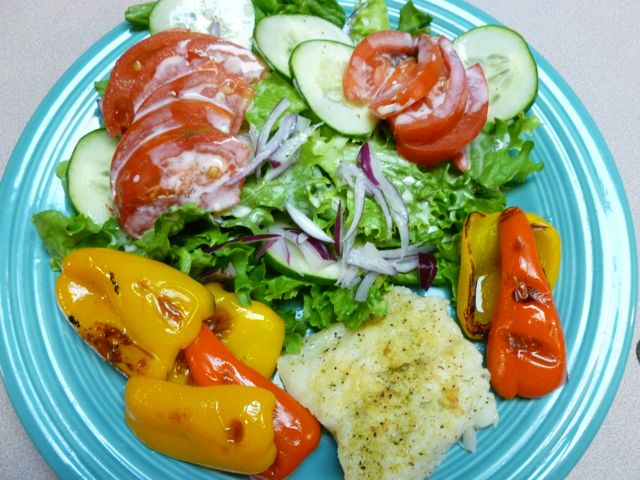
Now, lest you think I have jumped head first into a vat of sugar and fat with all my talk about Snicker Salad and Peanut Butter Cookies here's what I ate for supper tonight . . .


Grilled cod and mini peppers with salad. Tasty!

Jeremiah 31: 25 ~ For I have given rest to the weary and joy to the sorrowing.

Wednesday, September 19, 2012

Giant Stuffed Shells

Late this afternoon I joined some great friends for a bit of cooking before we enjoyed dinner delish. Four of us joined forces to create this meal, 12 year old young man, 10 year old lovely young lady who just days ago entered the age of double digits, their ageless mother and me. What a team!

Here's what we created . . .  Giant Stuffed Shells

Here's what you will need . . .


6 oz. giant pasta shells (about 20)
1 pound lean ground beef
1 large onion, chopped (about 1 cup)
1 clove garlic, minced
8 oz. shredded mozzarella cheese (2 cups)
1 egg, slightly beaten
1/2 cup fine dry Italian style or seasoned bread crumbs
1/4 tsp. pepper
1 jar (26-30 oz.) spaghetti sauce
1/4 cup grated Parmesan cheese


Here's what you will do . . .


Preheat oven to 400 degrees.

Cook pasta shells in boiling water according to directions on box. Drain. Rinse in cold water, drain again. Set aside.

Meanwhile, in a large skillet over medium heat, cook the ground beef, onion and garlic until the meat is browned. Remove from heat and drain the fat from the meat. Stir in the mozzarella cheese, beaten egg, bread crumbs and pepper. 

Pour about 3/4 cup of the spaghetti sauce into the bottom of a 9" x 13" baking dish.

Spoon about 3 tablespoons of the meat mixture into each cooked pasta shell. Arrange the stuffed shells over the sauce in the dish. Pour the remaining sauce over the shells. Sprinkle with the Parmesan cheese. 

We squeezed in a few extra shells. They all look so happy nestled in the pan, ready for sauce.

 Loosely cover the baking dish with foil. Bake for 20-25 minutes or until heated through. 

Garnish with fresh parsley if desired. 

Dividing the tasks . . .


The kids are beginning to readily jump in and work. We mentioned grating Parmesan and the young lady leapt right to the task. The young man ran to get the onions and chopped until his eyeballs demanded I take over the job.
He cut the onion in half from top to bottom and peeled the onion.

Lay it flat and cut through, but not all the way to the stem. Cut all the way across in narrow slices. Then turn the onion sideways and cut narrow slices. The onion will fall apart in tiny squares.
We worked on the onions, the garlic and the cheese while ageless Mom got the water boiling and the meat in the skillet. Once the onion and garlic where chopped and minced they cooked with the meat. While the mom cooked the meat the kids and I measured the bread crumbs, beat the eggs, measured the pepper and sauced the baking dishes. Yes, baking dishes. This family of more than the average number of children also had a harvest crew to feed. This was the perfect recipe to multiply and bake two pans at once. 

Now for the SURPRISE!


We had a super duper extra special salad tonight. It is one of those "sometimes" salads, not an every day salad like a lovely green salad. No, this is more treat or dessert than salad, Snicker Salad! The kids jumped right in, chopping snickers bars and cutting apples, and adding it to the pudding and whipped topping mixture. 

Our dinner was made even better by sitting around the table, hearing about school and activities. I enjoy sharing this family time and feel blessed to put my feet under their table.

BTW . . .

This is a great make ahead pasta recipe. Make and stuff the shells, cover with foil and refrigerate till later in the day or even overnight. Since it will be cold when you bake it, you will need to bake 15-20 minutes longer.  Be sure to bake until shells are heated to at least 140 degrees. You can check this with an instant read thermometer.

Leftovers keep well for a few days. Reheat, covered with foil, in the oven or reheat, covered loosely with waxed paper, in the microwave.  

Happy dinner! 


Monday, September 10, 2012

Surprise! Eggplant Is Delish!

One of my many blessings happens to be sharing recipes with my sisters. A few weeks back Pam told me about a great Angel Hair Pasta with Eggplant and Tomatoes recipe. Ok, I thought, I will try it sometime, but honestly it wasn't high on my list. She insisted it was really good, but I remembered the big purple fruits of the eggplant that my Grandpa grew in his garden and brought to my mom. All I can remember is that it was "slimy", but a few days ago an eggplant found its way into my grocery cart anyway. After all, Pam said it would be good and she is pretty much always right about such things.

Today was the day to give it a try so here we go with the recipe, my version of it. 


Angel Hair Pasta with Eggplant and Tomatoes

1 medium eggplant, sliced into 1/3" thick rounds
4 yellow mini peppers
Olive oil cooking spray
1 tsp. olive oil
3/4 tsp. salt, divided
1 clove garlic, minced
1 large fresh tomatoes, cut into large dice
1/4 tsp. crushed red pepper flakes
1/4 tsp. black pepper
2 Tbsp. fresh basil,  minced (or 2 tsp. dried basil)
2 Tbsp. fresh chives, minced (or 2 tsp. dried chives)
1/2 c. chicken broth
8 oz. angel hair pasta, cooked according to package directions
4 oz. feta cheese, crumbled

Preheat grill to medium. Lay eggplant slices in single layer on a cookie sheet. Spray with olive oil cooking spray and sprinkle with 1/2 tsp. of salt, flip and continue with other side. Transfer eggplant slices and whole mini peppers to grill rack. After 2-3 minutes (or when lightly browned) flip over and cook the other side. Cook until eggplant is tender and until peppers soften. Remove from grill. Cut into bite side pieces, discarding pepper seeds and stems. Set aside.

Cook pasta in boiling water according to package directions.

Heat olive oil in a skillet over medium heat. Add garlic and cook until softened, about 1 minute. Do not let garlic burn. Add tomatoes and cook until slightly softened. Add cooked vegetables, remaining 1/4 tsp. salt, remaining seasonings, and chicken broth and cook for a few minutes until broth is slightly reduced. Add cooked pasta and toss to coat. Add cheese just before serving.

Serves 6
Vegetable sauce is done!

Here's what I did . . .


Remembering that a recipe like this one is a guideline, I made a few little changes. When it came to salting the eggplant slices, I simply cranked my grinder a bit on each side of each slice after I lightly sprayed it. I didn't measure the 1/2 teaspoon.

Get all the vegetables cut and ready to go. Measure all the seasonings and the chicken broth. Prep before cooking, so that nothing overcooks while you are prepping.

I didn't have angel hair on hand, but I did have bow tie pasta. That will work! It will be different, but good, all the same. Pasta is pasta. It took less time to cook the sauce than the pasta, so I got the water boiling and the bow ties were cooking before I started cooking the sauce. If you use angel hair, it will cook faster than my pasta. When it is done, drain it. Put it in a bowl and cover it to keep it warm until your sauce is ready.

I didn't have feta either, but I did have a chunk of parmesan, so I grated some of that to use instead. Feta would be really good, so I will try that next time, but the parmesan was delicious, too. Use what you have.

Personally, I like vegetables so I made the full amount of sauce, but only cooked half the amount of pasta. That gave me plenty of pasta and sauce for 3 delicious meals. 

I am already thinking ahead to the next time and the possibility of adding purple onion or maybe adding some fresh spinach at the very end of the cooking time.

I liked the eggplant much more than I expected. It was a happy little surprise and now I want to try more recipes to see just what I have been missing!

Serve with a salad for a great dinner.


According to the recipe notes, you can roast the vegetables instead of grilling. Preheat oven to 425ºF. Line a baking sheet with foil and give it a spray. Place vegetables on prepared baking sheet and coat with cooking spray; season with 1/2 teaspoon of salt. Roast, until lightly browned, about 20 minutes. Remove from oven and cool to room temperature.

Eggplant, give it a try! You might like it, just like I did. It's never too late to learn something new!


Monday, September 3, 2012

Correction! Salt needed!

An engineer friend noticed that I left out the salt amount on the Red Velvet Cake recipe. Yikes! So, thanks to Dave I have made the necessary correction and added 1 tsp. salt to the ingredient list. I apologize and hope no one made a flat tasting cake. 


One of the neat things about salt is that it enhances the sweetness of the product and intensifies the flavor. It doesn't make baked products taste salty (unless too much is added), but it brings out the sweetness. Cool, huh? If the salt is left out the taste is rather flat and the taster can tell something isn't quite right.

Saturday, August 25, 2012

Happy Birthday, Sam

I should be baking a Red Velvet Cake today because it was Sam's all time most requested favorite birthday cake. Sunday, August 26 should be Sam's birthday, he would be 62.

Birthdays have always been a big deal to me. I love the celebration, the cake, buying and wrapping the presents, taking the pictures, the surprise and the wonder of it all. Celebrating the great gift of the birthday person in my life is the very best part.

During my growing up years, birthday cake was always a frosted, decorated angel food cake, lovingly made by my Mom. After all, we had chickens on our farm therefore there were plenty of eggs, so Angel Food cake was just the ticket. She always cut a cardboard circle from the empty powdered sugar box to cover the hole in the middle of the cake.  We always ate the cake for dessert after a delicious supper with the menu chosen by the birthday celebrant. This is an epic photo of, I think, my 8th birthday and that's my cute little sister, Karla in the high chair and most likely we had fried chicken with mashed potatoes and gravy.


So, this year we have to somehow celebrate the gift of having had Sam in our lives even though the empty space in our family will be huge.

Back to the Red Velvet . . . 

The first time I asked Sam what kind of cake he wanted for his birthday he promptly answered, "Red Velvet." Wonderful! I had a recipe for this cake and I liked it, too! I first made it when I was in high school and during my college years my mom had copied the recipe and mailed it to me when I had asked for it. So, way back in the mid 70's I pulled out this recipe and first made it for Sam.

I am so very glad to have this recipe written in my mom's handwriting. You can see it has been used many times!


Once in a while we deviated from the Red Velvet but not often. I sometimes got a wild idea and Sam gave me permission to make something different. 


He was seemed happy with my version of this Watermelon Cake. Actually, he was happy to have his cute little girls on his lap. I think this was the year Sam turned 41. 

This next photo was one of Sam's birthday cakes, too, but made by Rachel in 2009. She decided she wanted to dabble with fondant. Researcher that she is, she found a recipe, read reviews and called on our favorite professional cake baker to come give her a little help. Here's what she came up with . . . very cool, huh?


Rachel's happy birthday White Cake

It wasn't Red Velvet, but Sam loved it!


Back to the Red Velvet once again . . .

Waldorf Astoria Red Velvet Cake

1/2 c. shortening
1 1/4 c. sugar
2 eggs
2 Tbsp. cocoa
1 tsp. vanilla
1 tsp. salt
1 c. buttermilk
2 1/2 c. flour
1 1/2 tsp. baking soda
1 tsp. vinegar
2 oz. red food coloring

Cream shortening, sugar, eggs. Make a paste of cocoa and food coloring and add to above. Mix salt and vanilla with milk. Add alternately with flour. Mix soda and vinegar. Fold into mixture; do not beat. bake in 2 round 9 inch pans at 350 degrees for 30 minutes.

Icing

5 Tbsp. flour
1 c. milk
1 c. butter
1 c. sugar
1 tsp. vanilla

Cook flour and milk to stiff paste. Let cool completely. Cream butter, sugar, & vanilla. Add dto paste and beat until it looks like whipped cream.

There you have it! The original recipe and directions, but here's a few notes from the teacher in me . . .

Before you begin, preheat the oven and prep the pans. My favorite method is to cut a circle of parchment paper to fit in the bottom of the pan by penciling around the pan and cutting just inside the line. Lightly spray the top of the paper, just a little. Pans are ready!

Cream -- Put these ingredients in your mixer and beat the dickens out of it, till it is light and fluffy.

Use cake flour for the very best results, but I have also done this with all purpose and with a mixture of the two and all make a good cake. Just be sure to sift the flour! I usually sift the salt with the flour instead of mixing it with the milk. That just makes more sense to me.

Add alternately -- Gently stir or mix in about 1/3 of the sifted flour (just eye ball it), then gently stir in about 1/2 of the milk/vanilla. Repeat, then end with the last 1/3 of the flour. Just remember, start and end with flour, mixing as little as possible.

Fold -- Use rubber spatula and a gentle down across the bottom and up and over motion. Turn the bowl and repeat until you can't see streaks of the soda and vinegar. Just remember, gently!

Cake is done when you poke the center with a toothpick and it comes out with just a few crumbs of cake. It might come out clean, shouldn't have any wet batter.

Let the cake sit in the pans on a rack for 10 minutes. After 10 minutes remove cakes from pans by running a knife around the edge to loosen then put another rack on top of cake and flip the whole business over upside down. Gently lift off the pan and don't move the cake until it is cool. 

When you get ready to layer the cakes, slice the top dome shape off of the bottom layer to keep it flat. I will let you figure out what to do with that piece you cut off. You can imagine what I always did with it and it did not involve the waste basket!

Do not judge the frosting by the ingredients! Just remember, this is sometimes food, not every day food. I can not imagine who dreamed up this recipe and thought it might taste good, but it does! I don't think a slice or two of this cake at birthday time can clog one's arteries in an instant. Moderation is key!

Stir constantly while cooking the flour and milk. Using a whisk will prevent lumps, but you will get a blob in the center of your whisk. Start with the whisk and part way through trade it for a wooden spoon. Let this cool to room temperature before proceeding.

Beat the butter and sugar till very light and fluffy before adding the paste then beat it till you think it is done, then beat it some more. You want this so light that you can't feel the grains of sugar at all. You want silky smooth, not gritty.

When you get this cake done, have a party, call some friends, share it. DO NOT EAT IT ALL YOURSELF!

Sam's Red Velvet birthday cake 2010, his 60th birthday.


We celebrated Sam's 61st birthday, last year, about a week early, before Rachel left for her last year at Knox. Sam was able to request crab legs and steak along with the Red Velvet and that's what we had. Sam and I left for our first trip to Duke University's brain tumor center two days before his birthday, on the first day of school my first year of retirement. Sam was very sick. On his birthday he received the chemo treatment that brought him nearly instant relief and later that same day we flew home. It wasn't the easiest travel with 3 flights on chemo day but we were being chased by the hurricane Irene. 

He continued to improve in the days and weeks to come. This treatment bought him enough time that we really had some great months together. I have considered that trip to Duke to be one of the best birthday gifts of Sam's life. It was a miracle. I wish it could have lasted longer, but it was a blessing, indeed!

I will celebrate Sam's life with Abby, Rachel and Kyle. We plan to enjoy a meal (always!) and a visit to a cupcake shop where we can each choose our own "birthday cupcake". We might also play some mini golf; Sam would love that!

We continue to adjust and heal as we continue to miss Sam. Writing about Sam is healing for me, so thanks for reading. 

Isaiah 41:13 ~ For I the LORD your God, hold your right hand; it is I who say to you, "Do not fear, I will help you."  


Wednesday, August 22, 2012

Hoity Toity Fish? Not Really!

The back story . . .

Last week a friend of mine suggested we cook some fish. We began our discussion of how to cook said fish and she mentioned that she had once used parchment paper pouches to cook fish with good results. This got my attention, to say the least! 

Now, I am a huge fan of using parchment paper for baking, but I have always been a bit intimidated by the use of parchment paper in cooking other foods. My reluctance, I believe, comes from the proper name of this cooking method, which is "En Papillote".  In my mind, anything with a French name like that must be terribly difficult or time consuming or super expensive or at the very least doused in butter or cream!

My friend is one of those gutsy individuals who is willing to dive head first into any challenge, yet tells me she could use some help with her cooking skills. So, if she has tried this I ought to as well! I decided right then and there, that it was time to climb up on that horse and RIDE! Let me say, this turned out to be a very tame ride, indeed! 


So, here we go . . .


I assembled my ingredients and cut my veggies. I really like veggies, so I chose summer squash, carrots and red pepper. These are cut in julienne strips. Fish cooks quickly, so veggies need to be in small pieces otherwise they will not be cooked when the fish is done. The green stuff is fresh dill. You could use dried dill, just not as much. Preheat the oven to 450 degrees. A hot oven is needed to create some steam to cook the fish and the vegetables.


Looks good already!

Tear off a piece of parchment paper approximately square. You will need one piece per fish fillet. Fold it in half and open it back up. Lay the vegetables on the bottom half of the paper and sprinkle on some salt and pepper, just a bit. Lay the fish, I used cod, on top of that and drizzle on a teaspoon or so of olive oil, a touch more salt and pepper, the lemon slices and finally the dill.


How's this for a stack of beauty???


Fold the top half of the paper over and starting at one corner fold a little triangle and fold it over again. Move over just a bit and make another little triangle fold, overlapping with your previous folded section. Don't think too much about this, just do it. Keep folding little sections and overlapping them, just sort of zoop zoop and you are over to the other side before you know it. Look at my picture and you will see it isn't a pretty package, but the idea is to seal the edges, keeping the steam and cooking juices in the package. Put the package on a baking sheet, one that has a rim just in case a bit of juice leaks out.


Crimp the edges to seal in the moisture.

If you have several packages use a larger pan, or use two. Consider having each person in the family make their own package. Use whatever vegetables you like or have on hand or skip the vegetables all together, but if you do, make a salad or roast your veggies separately. Just make sure you enjoy some vegetables at every meal. 

Bake at 450 for 10-15 minutes, depending on the size of your fish fillets. Mine was small, about 4 ounces and relatively thin so I cooked it for 10 minutes.

When it is done, take it out, and carefully open the package. Discard the lemon and dill. Carefully lift it out onto a plate with a spatula. Spoon or pour some of the juice over the fish if you want. 


I really do like vegetables!

Cod is a very mild tasting fish, so the lemon and dill were great accents . Orange roughy, salmon, halibut or lots of other choices would work well, too. A fresh sprig of dill would have made a nice garnish on this plate, fancying up the fish a bit.

Okay! I got on the horse and rode like a pro! It wasn't the rodeo ride I expected or even a trail ride to the bottom of the canyon, but more like a gentle mosey down a shady trail, one I am willing and anxious to do all over again. Give it a whirl and let me know how it goes. Enjoy!

Wednesday, August 15, 2012

Happy Birthday, Julia!

A few days back I read that today, August 15, 2012 would have been Julia Child's 100th birthday. Oh, happy birthday to you, Julia! My, how you changed us and paved the way for many of us to learn more and more about good food.


Julia, was in her 30's when she decided she wanted to learn to cook. She and her new husband, Paul found themselves living in Paris when Julia took her first cooking class. This unleashed a passion in her that she pursued the rest of her life. 

A few years back I found myself in Washington, D.C. with my sister-in-law. We were beyond delight when we found Julia's kitchen in the Smithsonian's National Museum of American History. It is the very kitchen from her Cambridge, MA home where her TV shows were taped. It is a rather ordinary looking room, but it was built for her, with higher than normal counters to accommodate her height, ovens that will hold 2 large turkeys, and a peg board wall full of copper pans.

To this day I enjoy watching her bake or cook on her Saturday morning PBS show. I find wisdom, entertainment and inspiration every time I watch her or read something she has written.

So, how will I celebrate her life today? I am baking bread and later today I will go cook a great meal with good friends, some halibut in parchment packages, a mix of garden vegetables, some fruit and of course, my bread. I think Julia would approve.

I have always enjoyed and chuckled over quotes by Julia. Here's one of my all time favorites. "Find something you're passionate about and keep tremendously interested in it."  Oh, boy! Isn't that a choice piece of advice!?! For me, one of those passions is cooking, but there are others for me, too. For Sam, it was golf and the great out doors. What about you?

In celebration of Julia's 100th birthday, I lost myself for a while in some of her great quotes, some of which I know you will enjoy. Here goes . . .

"Cooking is like love. It should be entered into with abandon or not at all."  I won't lie, that one made me cry a little bit.

"I was 32 when I started cooking; up until then, I just ate."
Look out! Learning to cook will change your life! Bring it on!

"You learn to cook so that you don't have to be a slave to recipes. You get what's in season and you know what to do with it." 

"If you're afraid of butter, use cream."  Tehehehe!

"The only real stumbling block is fear of failure. In cooking you've got to have a what-the-hell attitude."  

". . . small helpings, no seconds, no snacking and a little bit of everything." Great philosophy for healthy eating if you ask me! Remember, she lived well into her 90's!

"Ye gods! But you're not standing around holding it by the hand all this time. No, the dough takes care of itself. While you cannot speed up the process, you can slow it down at any point by setting the dough in a cooler place. Then continue where you left off, when you are ready to do so. In other words, you are the boss of that dough."  Now, imagine that being said in that throaty full Julia Child voice!

And last by not least . . . "Bon Appetit!"