Saturday, December 1, 2012

First Cookies Of The Season

Advent is upon us, the waiting has begun. Today I am packing up Thanksgiving and I am getting Christmas out of the closet. Rachel and I used the Christmas plates and cups this morning for our eggs and toast and last night I baked my first batch of Christmas cookies. 

Our church youth group hosts their annual cookie sale next Saturday morning where customers fill a red bucket from tables filled with beautiful trays of baked and decorated cookies and candy.  Here's the scoop on my first cookie sale offering . . .


Andes Mint Cookies

3/4 cup butter
1 1/2 cups brown sugar
2 Tablespoons water
1 1/2 cups chocolate chips
2 eggs
2 1/2 cups flour
1 1/4 teaspoons baking soda
1/2 teaspoon salt
Andes Mints ~ they come in a green box and are triple layer with a strip of green in the        
                     center, each one wrapped in green foil

Melt the butter with the brown sugar and water in a heavy saucepan over medium heat. Stir until all is melted together; remove from heat and add the chocolate chips. Stir until chips are melted. Set aside to cool for 10 minutes.

Sift together the dry ingredients and set aside.

Add eggs one at a time to chocolate mixture, beating well after each. Stir in dry ingredients.

Chill dough until firm. Roll into balls and space 2 inches apart on cookie sheets. Bake 8-10 minutes at 350 degrees until cookies are puffed but set at the edges. Remove pan from oven and immediately top with an Andes Mint. Let set until candy is soft and melting, then swirl with a knife before removing from pan. Cool completely. Freezes very well.

A Little More I Have Learned Along The Way . . .

I usually chill the dough overnight, but a couple of hours is long enough. I use my smallest cookie scoop to make the balls. I do not roll them, too messy for me. I line the cookie sheets with parchment, but years ago I used bare ungreased sheets with success, too. Unwrap the candy ahead of time (but not too far ahead or you better buy an extra box!) and cut each piece into half or thirds depending on how big your cookies are. I like small cookies and cut into thirds. There are usually a few some shards of candy left on the plate which is enough for one cookie. I buy one box of mints per batch and have almost enough candy for the whole batch. I always seem to end up with just a few naked cookies. Gee, too bad. I will let you guess what happens to those tasty little morsels. 

Do not overbake! When I take them out of the oven they do not really look done, but all puffed up. They are beginning to firm up around the edges, but the center is still gooey. Leave on the cookie sheets and quickly plop on the mints. It only takes a minute or so for the chocolate to melt enough to swirl around a little. Leave on pans until cookies firm up. I put on waxed paper until the chocolate solidifies. 


Happy baking to one and all. If you don't want to bake come to St. Luke United Methodist Church and fill a bucket or two! If you don't live close by I bet you can find a similar deal in your area. 

Sunday, November 25, 2012

Many Thanks!

I have much to be thankful for and I won't bore with a big list. Of course I must mention faith, family, friends, and food, but of course, there is so much more. During the month of November I have been giving thanks each day by adding my gratitudes in form of leaves on my tree. 


My tree of gratitude

A New Kind of Thanksgiving

A few people had given me the suggestion of trying some new things at the various holidays this year. Since everything is the "first" without Sam, everything is different whether we try for different or not. At first I couldn't imagine doing things differently, but as it turned out we did do things a little differently. 

First of all I started seeing photos of different foods arranged to look like turkeys. Then my brother Doug suggested we have a turducken! Let me tell you a little more by showing you what we did on our Thanksgiving day.

Isn't that a different way to have turkey?

The photo doesn't do this turkey justice, much cuter in person.
Our token nerd turkey!

Our little appetizer turkey cheese ball, fun and tasty!


Tada! It's turducken!
The turducken is a whole boned turkey, a whole boned duck and a whole boned chicken with stuffing between the layers, then it's rolled all up together. Ours was prepared, cured and roasted by "Augusta" in Oxford, IA. Their establishment is the brainchild of relocated Louisianans, therefore our turducken had a cajun twist with some tasty seasoning and cornbread stuffing. It was a great way to give our Thanksgiving feast another angle. 

Plenty of Tradition

We balanced all this new and different with plenty of traditional dishes. We had corn, green bean casserole, fruit salad, mashed potatoes and gravy, dressing, turkey tail fan rolls, cranberry relish, plenty of pies and oh, yes, even a turkey.


Our turducken was advertised to serve at least 12. Our gathering was going to be closer to 20, so a turkey was also prepared. The turducken would have been enough for 12 if that was all they were eating! We were amply blessed by more than enough to eat!

Tradition mixes with new and different.
Delicious!

More Fun On Friday!

We celebrated Rachel's 23rd birthday at the Iowa State game followed by birthday cake at home that evening. It was a good day (except for the final score and the temperature) and again, it had a different twist, one Sam would have enjoyed.


Happy Birthday, Rachel!
We have celebrated a very nice Thanksgiving and birthday weekend, and I will continue to add leaves to my tree this week. Now I must close because it is time to mix in a little Christmas. I need to get back to the kitchen and cook up my first batch of Christmas caramels. More another day.

Wednesday, October 24, 2012

My Favorite Fall Dessert

The fruits of the season are always my favorites. The flavor, quality and price can't be beat when produce is in season so right now I am loving all the squash, the apples and pears. 

I can almost smell the fruits and the cinnamon even as I simply think about and begin to write about this Fall Fruit Bake. I hope you like it as much as I do. 


The Recipe . . .

Keep in mind that this is a guideline. Don't get too caught up in exact measurements.

Fall Fruit Bake

3 apples, any variety 
1 pear
1/4 cup dried cherries
1/4 cup chopped walnuts
1 tablespoon brown sugar
1 teaspoon cinnamon
2 tablespoons water

Quarter the apples and pears, core, and dice. Place in shallow microwavable dish. Add remaining ingredients; mix. Cover the dish and microwave for 6-8 minutes until fruit is very tender.

Serve at once with ice cream.


Here's What I Do . . .

Since my family and friends enjoy this dish, I usually use 1 piece of fruit per person. If I have 2 or 3 pears that need to be used, I might use more pears than apples. If I don't have any pears I might simply use all apples. Use what you have and what you like. 

Do not peel the fruit. The fiber is good for the system and it add some texture to boot. If you use a red apple, a green apple and a yellow pear the color is wonderful, too.

I like dried blueberries, too. So, substitute for cherries if you wish. Or you could use raisins. 

Sometimes I use sliced almonds instead of the walnuts. 

I love cinnamon! I usually use at least a heaping teaspoon and I like the addition of 1/4 teaspoon of nutmeg if I think about adding it, too.

If I am using a pie plate, I simply turn a plate upside down to cover. Maybe you have a covered casserole dish you could use. If not, use a piece of microwavable plastic wrap to cover your dish. You want to keep the steam in, to soften the fruit as it cooks.

Now For The Kicker!

This recipe is super as it is, but it is out of this world when served with a scoop of Cinnamon Ice Cream. Put the fruit and a scoop of ice cream (vanilla is also very good) in a dish and watch the ice cream begin to melt as you slowly savor each bite. 

Enjoying it with a good cup of coffee and the company of very good friends is one of my favorite ways to spend a fall Friday evening.

Enjoy!


Wednesday, October 17, 2012

Stromboli


What Is It?

It isn't a sandwich. It isn't a pizza. It isn't a loaf of bread. It is a hybrid of all those things. In the earlier years of teaching Food and Nutrition classes this recipe made a wonderful project for following directions and using teamwork to accomplish a task when the team didn't really know what the final outcome would look like. I never gave them a picture; they had to trust the process. When eateries like Old Chicago began to appear many became familiar with Stromboli. 

Here we go . . . 


When done it will be piping hot and looking like this!

And this is what it will look like on the inside, oozing with goodness!

The Dough

You can thaw a loaf of frozen bread dough or use the following recipe.

Stromboli Dough


1 ¼ tsp. yeast
1 c. warm water
1 Tbsp. sugar
1 Tbsp. soft  margarine
¾ tsp. salt
2 ¾ to 3 c. flour


Combine the warm water, sugar and yeast in large mixing bowl.  Let yeast mixture rest for 5-10 minutes or until foamy.  

Add salt, margarine and 1 cup of flour.  Beat until mixture is smooth.  Add remaining flour until dough forms a ball and no longer sticks to the side of the bowl.  Turn dough onto floured counter and knead for 5 minutes or until smooth and shiny.

Place dough in a well oiled bowl, cover, and let rise until double in size, about 45-60 minutes.

Now What?

Stromboli

1 loaf frozen bread dough, thawed (or above recipe)
1 egg, beaten
2 Tbsp. olive or vegetable oil
¼ tsp. each garlic powder, salt, pepper, ground mustard, and oregano
½ lb. ground beef, cooked and drained
2 oz. pepperoni
1 c. shredded mozzarella cheese
½ c. shredded cheddar cheese
2 Tbsp. chopped onion

1.  Place the thawed bread dough in a greased bowl, turning once to grease top.  Cover and let rise in a warm place until doubled, about 45 minutes.  (This step is already done.)

2.  Punch down.  Roll dough into 15” x 12” rectangle.

3.  Combine egg, oil and seasonings in a bowl.  Brush over dough to within ½” of edges.  Set remaining egg mixture aside.

4.  Arrange cooked beef, pepperoni, cheeses and onion on dough to within ½ “ of edges.  Roll up jelly-roll style, beginning with one long side.  Seal edges well.  place seam side down on greased baking sheet (or lined with parchment paper).  Brush with remaining egg mixture.  Bake at 375 degrees for 30-35 minutes or until lightly browned.  Do not under bake. Let stand for 5 minutes before cutting. 

 Speaking From Experience . . .

If you are going to use the frozen dough, plan ahead! You will need plenty of time to thaw it out. The above recipe was developed when I failed to plan ahead and the recipe worked so well that I've used it ever since. It is a basic white bread recipe. I have also used whole wheat flour and you can also let the bread machine mix the dough. Just don't let it bake!

The egg and oil mixture is enough for two, so if you are doubling, do not double that part.

You might think you want some pizza or marinara sauce in here, but trust me, if you absolutely must have sauce, use it very sparingly. You won't miss it and too much makes this messy and soggy. You can use the sauce for dipping at the table if you want.

Likewise, do not over-cheese this thing. When you take it out of the oven feel free to butter or oil the top a bit and sprinkle it with parmesan if you want.

When you get to the rolling up part, 4 hands work quite well, so find a friend to help you. In fact, find a friend to share the entire process. It makes things so much more enjoyable. It could easily be a child, a spouse, or anybody you enjoy being around. Let me suggest that even if it is a family member you might not feel like being around, this might just change everyone's attitudes! Working together to create good food will do that, you know.

When it is rolled into a log, sort of pinch the last edge to the log, so it is sealed. Once you get it moved onto the pan press the side of your hand firmly into the log right near each end to seal it shut, then flop that little end under the rest of the log. If it isn't sealed shut the cheese will melt and run out. Keep that yummy cheese inside!

I much prefer parchment paper on the baking sheet to greasing it. Clean up is a snap and the bottom won't burn.

One More Idea . . .

This is another of those "guideline" recipes. If you don't want pepperoni, don't use them. If you want sausage rather than ground beef, go for it! If you want to add peppers and mushrooms, do so, but chop them small. 

Feel free to experiment with fillings. The following is made with cooked chicken, steamed broccoli, a tiny bit of alfredo sauce, parmesan cheese and mozzarella.

Very good!


I have always wanted to try a Breakfast Stromboli, but I have yet to actually do it. Maybe scrambled eggs, bacon, ham, or sausage, with cheddar cheese would be good, along with a few peppers, tomatoes, and onions. I might have to give this a try!

Have fun with this wonderful recipe.


Tuesday, October 2, 2012

Special Dinner


One evening in the fall of 1975 Sam first came to dinner at my house. He seemed to enjoy that first dinner of steak, salad, baked potato and apple pie and, in fact, I repeated it for him every year since then during the last week of September. It was a little anniversary celebration for us each year. I was going to live without it this year, but I couldn't. 

Last weekend when I spent time with Sam's brother and his wife "down at the farm" that Sam loved so much, I had the perfect opportunity to share this favorite meal of Sam's. The good food was the perfect compliment to the gorgeous weather and the pretty view.


Sam's favorite salad dressing was Thousand Island which I often made for him. Steve and Jessie both like Blue Cheese Dressing so I made both. I like to make salad dressings. They taste so much better, more flavorful and fresh than the ones in the bottle. I urge you to take time to try some salad dressings. These are a little heavier and more rich than I make on a regular basis, but they are really good for a special dinner. I have to say we had salads delish, along with ribeyes seasoned with Montreal steak seasoning. Yum! Thanks for grilling the steaks, Steve.


Thousand Island Dressing

3 eggs, hard cooked, peeled, and chopped
1/4 cup Worcestershire sauce
1 tablespoon white sugar
1/4 cup white vinegar
1 pinch ground cloves
1 quart mayonnaise
3/4 cup sweet pickle relish
1/2 cup chopped black olives
1/2 cup diced red bell pepper


In a medium bowl, whisk together the chopped eggs, Worcestershire sauce, sugar, vinegar, cloves, mayonnaise, relish, olives and red pepper until evenly blended. Chill and serve spooned over fresh greens. Store in the refrigerator.


Creamy Blue Cheese Dressing

2 1/2 ounces blue cheese, crumbled (about 1/2 cup)
3 tablespoons buttermilk
3 tablespoons sour cream
2 tablespoons mayonnaise
2 teaspoons white wine vinegar
1/4 teaspoon sugar
1/8 teaspoon garlic powder
salt and pepper

Mash blue cheese and buttermilk in a small bowl with a fork until mixture resembles cottage cheese with small curds. Stir in remaining ingredients. Taste and add salt and pepper to taste. 


The perfect finish . . .


I think I have loved to bake pie ever since I baked that first one for Sam. Apple pies are always good, but fall is just the BEST time to bake an apple pie. I like to use a combination of Granny Smith apples, which are tart, and Gala apples which are crisp, but sweet. I love cinnamon and over the years I have learned to up the amount to at least 2 teaspoons, which is more than most recipes. I also use a little nutmeg in my apple pie.


The best part of the pie, besides the filling, is the crust. Years ago I settled on using half cold butter and half cold shortening for the best crust. It is crisp and flaky, but rich and buttery, too. Oh, my, I am getting hungry now!

And a little Saturday morning surprise . . .


Look closely, can you see the three deer at the top of the hill?
  
As Jessie and I were walking back "up from the lake" we noticed these three deer at the top of the hill. We stopped and watched for a while. They munched the grass and paid us no mind. Soon two of them ran off and a bit later the third bounded away. They were beautiful to watch. Sam would have loved it.


Thursday, September 20, 2012

Kitchen Fun Tonight!

I need a kid friendly dessert for a family event on Sunday. I was in the mood to try something new so I went searching on one of my favorite recipe sites, Allrecipes.com where I found Peanut Butter Sandwich Cookies. What kid wouldn't like that? I'm thinking most adults would like that, too! After all, what's not to like about peanut butter or sandwich cookies? So, putting them together is bound to be a winner. I noticed this recipe has 4 1/2 stars out of 5 and lots of reviews, which I quickly perused and decided this one was worth a try.

My finished cookies! Success!

You, too, can find this recipe by clicking here.  

I made the recipe as written with one change. The recipe as written calls for 1 cup of shortening. I used 1/2 cup shortening and 1/2 cup butter. I'm sure all shortening would have been good, too. 

I used my smallest cookie scoop to make the balls, so they would all be similar in size. Since this is a two cookie serving I wanted the single cookies to be small. 

Dip your fork in sugar to keep it from sticking as you flatten the cookies.

Do not over bake! I baked for 6 1/2 minutes and watched them closely. As soon as they began to turn golden I yanked them out of the oven and let them rest on the hot pans for a couple of minutes as the next pan went into the oven. 

When frosting the cookies, put a dollop in the center of the flat side of one cookie, and top it with another cookie putting the flat sides together and gently pushing them together to spread out the frosting. 

As I was making the sandwiches I thought chocolate frosting would be mighty tasty, so part way through I added 1 tablespoon of baking cocoa to the frosting and made the remainder peanut butter chocolate sandwich cookies. Yum! 

Can you see the two different frosting fillings?
I predict that these cookies will be a hit with kids of all ages! They are flavorful and chewy. I will keep them nice and soft by putting a slice of bread in the plastic container with the cookies. 

Now, lest you think I have jumped head first into a vat of sugar and fat with all my talk about Snicker Salad and Peanut Butter Cookies here's what I ate for supper tonight . . .


Grilled cod and mini peppers with salad. Tasty!

Jeremiah 31: 25 ~ For I have given rest to the weary and joy to the sorrowing.

Wednesday, September 19, 2012

Giant Stuffed Shells

Late this afternoon I joined some great friends for a bit of cooking before we enjoyed dinner delish. Four of us joined forces to create this meal, 12 year old young man, 10 year old lovely young lady who just days ago entered the age of double digits, their ageless mother and me. What a team!

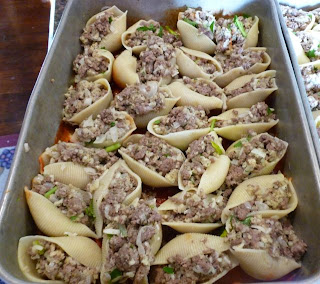
Here's what we created . . .  Giant Stuffed Shells

Here's what you will need . . .


6 oz. giant pasta shells (about 20)
1 pound lean ground beef
1 large onion, chopped (about 1 cup)
1 clove garlic, minced
8 oz. shredded mozzarella cheese (2 cups)
1 egg, slightly beaten
1/2 cup fine dry Italian style or seasoned bread crumbs
1/4 tsp. pepper
1 jar (26-30 oz.) spaghetti sauce
1/4 cup grated Parmesan cheese


Here's what you will do . . .


Preheat oven to 400 degrees.

Cook pasta shells in boiling water according to directions on box. Drain. Rinse in cold water, drain again. Set aside.

Meanwhile, in a large skillet over medium heat, cook the ground beef, onion and garlic until the meat is browned. Remove from heat and drain the fat from the meat. Stir in the mozzarella cheese, beaten egg, bread crumbs and pepper. 

Pour about 3/4 cup of the spaghetti sauce into the bottom of a 9" x 13" baking dish.

Spoon about 3 tablespoons of the meat mixture into each cooked pasta shell. Arrange the stuffed shells over the sauce in the dish. Pour the remaining sauce over the shells. Sprinkle with the Parmesan cheese. 

We squeezed in a few extra shells. They all look so happy nestled in the pan, ready for sauce.

 Loosely cover the baking dish with foil. Bake for 20-25 minutes or until heated through. 

Garnish with fresh parsley if desired. 

Dividing the tasks . . .


The kids are beginning to readily jump in and work. We mentioned grating Parmesan and the young lady leapt right to the task. The young man ran to get the onions and chopped until his eyeballs demanded I take over the job.
He cut the onion in half from top to bottom and peeled the onion.

Lay it flat and cut through, but not all the way to the stem. Cut all the way across in narrow slices. Then turn the onion sideways and cut narrow slices. The onion will fall apart in tiny squares.
We worked on the onions, the garlic and the cheese while ageless Mom got the water boiling and the meat in the skillet. Once the onion and garlic where chopped and minced they cooked with the meat. While the mom cooked the meat the kids and I measured the bread crumbs, beat the eggs, measured the pepper and sauced the baking dishes. Yes, baking dishes. This family of more than the average number of children also had a harvest crew to feed. This was the perfect recipe to multiply and bake two pans at once. 

Now for the SURPRISE!


We had a super duper extra special salad tonight. It is one of those "sometimes" salads, not an every day salad like a lovely green salad. No, this is more treat or dessert than salad, Snicker Salad! The kids jumped right in, chopping snickers bars and cutting apples, and adding it to the pudding and whipped topping mixture. 

Our dinner was made even better by sitting around the table, hearing about school and activities. I enjoy sharing this family time and feel blessed to put my feet under their table.

BTW . . .

This is a great make ahead pasta recipe. Make and stuff the shells, cover with foil and refrigerate till later in the day or even overnight. Since it will be cold when you bake it, you will need to bake 15-20 minutes longer.  Be sure to bake until shells are heated to at least 140 degrees. You can check this with an instant read thermometer.

Leftovers keep well for a few days. Reheat, covered with foil, in the oven or reheat, covered loosely with waxed paper, in the microwave.  

Happy dinner! 


Monday, September 10, 2012

Surprise! Eggplant Is Delish!

One of my many blessings happens to be sharing recipes with my sisters. A few weeks back Pam told me about a great Angel Hair Pasta with Eggplant and Tomatoes recipe. Ok, I thought, I will try it sometime, but honestly it wasn't high on my list. She insisted it was really good, but I remembered the big purple fruits of the eggplant that my Grandpa grew in his garden and brought to my mom. All I can remember is that it was "slimy", but a few days ago an eggplant found its way into my grocery cart anyway. After all, Pam said it would be good and she is pretty much always right about such things.

Today was the day to give it a try so here we go with the recipe, my version of it. 


Angel Hair Pasta with Eggplant and Tomatoes

1 medium eggplant, sliced into 1/3" thick rounds
4 yellow mini peppers
Olive oil cooking spray
1 tsp. olive oil
3/4 tsp. salt, divided
1 clove garlic, minced
1 large fresh tomatoes, cut into large dice
1/4 tsp. crushed red pepper flakes
1/4 tsp. black pepper
2 Tbsp. fresh basil,  minced (or 2 tsp. dried basil)
2 Tbsp. fresh chives, minced (or 2 tsp. dried chives)
1/2 c. chicken broth
8 oz. angel hair pasta, cooked according to package directions
4 oz. feta cheese, crumbled

Preheat grill to medium. Lay eggplant slices in single layer on a cookie sheet. Spray with olive oil cooking spray and sprinkle with 1/2 tsp. of salt, flip and continue with other side. Transfer eggplant slices and whole mini peppers to grill rack. After 2-3 minutes (or when lightly browned) flip over and cook the other side. Cook until eggplant is tender and until peppers soften. Remove from grill. Cut into bite side pieces, discarding pepper seeds and stems. Set aside.

Cook pasta in boiling water according to package directions.

Heat olive oil in a skillet over medium heat. Add garlic and cook until softened, about 1 minute. Do not let garlic burn. Add tomatoes and cook until slightly softened. Add cooked vegetables, remaining 1/4 tsp. salt, remaining seasonings, and chicken broth and cook for a few minutes until broth is slightly reduced. Add cooked pasta and toss to coat. Add cheese just before serving.

Serves 6
Vegetable sauce is done!

Here's what I did . . .


Remembering that a recipe like this one is a guideline, I made a few little changes. When it came to salting the eggplant slices, I simply cranked my grinder a bit on each side of each slice after I lightly sprayed it. I didn't measure the 1/2 teaspoon.

Get all the vegetables cut and ready to go. Measure all the seasonings and the chicken broth. Prep before cooking, so that nothing overcooks while you are prepping.

I didn't have angel hair on hand, but I did have bow tie pasta. That will work! It will be different, but good, all the same. Pasta is pasta. It took less time to cook the sauce than the pasta, so I got the water boiling and the bow ties were cooking before I started cooking the sauce. If you use angel hair, it will cook faster than my pasta. When it is done, drain it. Put it in a bowl and cover it to keep it warm until your sauce is ready.

I didn't have feta either, but I did have a chunk of parmesan, so I grated some of that to use instead. Feta would be really good, so I will try that next time, but the parmesan was delicious, too. Use what you have.

Personally, I like vegetables so I made the full amount of sauce, but only cooked half the amount of pasta. That gave me plenty of pasta and sauce for 3 delicious meals. 

I am already thinking ahead to the next time and the possibility of adding purple onion or maybe adding some fresh spinach at the very end of the cooking time.

I liked the eggplant much more than I expected. It was a happy little surprise and now I want to try more recipes to see just what I have been missing!

Serve with a salad for a great dinner.


According to the recipe notes, you can roast the vegetables instead of grilling. Preheat oven to 425ºF. Line a baking sheet with foil and give it a spray. Place vegetables on prepared baking sheet and coat with cooking spray; season with 1/2 teaspoon of salt. Roast, until lightly browned, about 20 minutes. Remove from oven and cool to room temperature.

Eggplant, give it a try! You might like it, just like I did. It's never too late to learn something new!


Monday, September 3, 2012

Correction! Salt needed!

An engineer friend noticed that I left out the salt amount on the Red Velvet Cake recipe. Yikes! So, thanks to Dave I have made the necessary correction and added 1 tsp. salt to the ingredient list. I apologize and hope no one made a flat tasting cake. 


One of the neat things about salt is that it enhances the sweetness of the product and intensifies the flavor. It doesn't make baked products taste salty (unless too much is added), but it brings out the sweetness. Cool, huh? If the salt is left out the taste is rather flat and the taster can tell something isn't quite right.

Saturday, August 25, 2012

Happy Birthday, Sam

I should be baking a Red Velvet Cake today because it was Sam's all time most requested favorite birthday cake. Sunday, August 26 should be Sam's birthday, he would be 62.

Birthdays have always been a big deal to me. I love the celebration, the cake, buying and wrapping the presents, taking the pictures, the surprise and the wonder of it all. Celebrating the great gift of the birthday person in my life is the very best part.

During my growing up years, birthday cake was always a frosted, decorated angel food cake, lovingly made by my Mom. After all, we had chickens on our farm therefore there were plenty of eggs, so Angel Food cake was just the ticket. She always cut a cardboard circle from the empty powdered sugar box to cover the hole in the middle of the cake.  We always ate the cake for dessert after a delicious supper with the menu chosen by the birthday celebrant. This is an epic photo of, I think, my 8th birthday and that's my cute little sister, Karla in the high chair and most likely we had fried chicken with mashed potatoes and gravy.


So, this year we have to somehow celebrate the gift of having had Sam in our lives even though the empty space in our family will be huge.

Back to the Red Velvet . . . 

The first time I asked Sam what kind of cake he wanted for his birthday he promptly answered, "Red Velvet." Wonderful! I had a recipe for this cake and I liked it, too! I first made it when I was in high school and during my college years my mom had copied the recipe and mailed it to me when I had asked for it. So, way back in the mid 70's I pulled out this recipe and first made it for Sam.

I am so very glad to have this recipe written in my mom's handwriting. You can see it has been used many times!


Once in a while we deviated from the Red Velvet but not often. I sometimes got a wild idea and Sam gave me permission to make something different. 


He was seemed happy with my version of this Watermelon Cake. Actually, he was happy to have his cute little girls on his lap. I think this was the year Sam turned 41. 

This next photo was one of Sam's birthday cakes, too, but made by Rachel in 2009. She decided she wanted to dabble with fondant. Researcher that she is, she found a recipe, read reviews and called on our favorite professional cake baker to come give her a little help. Here's what she came up with . . . very cool, huh?


Rachel's happy birthday White Cake

It wasn't Red Velvet, but Sam loved it!


Back to the Red Velvet once again . . .

Waldorf Astoria Red Velvet Cake

1/2 c. shortening
1 1/4 c. sugar
2 eggs
2 Tbsp. cocoa
1 tsp. vanilla
1 tsp. salt
1 c. buttermilk
2 1/2 c. flour
1 1/2 tsp. baking soda
1 tsp. vinegar
2 oz. red food coloring

Cream shortening, sugar, eggs. Make a paste of cocoa and food coloring and add to above. Mix salt and vanilla with milk. Add alternately with flour. Mix soda and vinegar. Fold into mixture; do not beat. bake in 2 round 9 inch pans at 350 degrees for 30 minutes.

Icing

5 Tbsp. flour
1 c. milk
1 c. butter
1 c. sugar
1 tsp. vanilla

Cook flour and milk to stiff paste. Let cool completely. Cream butter, sugar, & vanilla. Add dto paste and beat until it looks like whipped cream.

There you have it! The original recipe and directions, but here's a few notes from the teacher in me . . .

Before you begin, preheat the oven and prep the pans. My favorite method is to cut a circle of parchment paper to fit in the bottom of the pan by penciling around the pan and cutting just inside the line. Lightly spray the top of the paper, just a little. Pans are ready!

Cream -- Put these ingredients in your mixer and beat the dickens out of it, till it is light and fluffy.

Use cake flour for the very best results, but I have also done this with all purpose and with a mixture of the two and all make a good cake. Just be sure to sift the flour! I usually sift the salt with the flour instead of mixing it with the milk. That just makes more sense to me.

Add alternately -- Gently stir or mix in about 1/3 of the sifted flour (just eye ball it), then gently stir in about 1/2 of the milk/vanilla. Repeat, then end with the last 1/3 of the flour. Just remember, start and end with flour, mixing as little as possible.

Fold -- Use rubber spatula and a gentle down across the bottom and up and over motion. Turn the bowl and repeat until you can't see streaks of the soda and vinegar. Just remember, gently!

Cake is done when you poke the center with a toothpick and it comes out with just a few crumbs of cake. It might come out clean, shouldn't have any wet batter.

Let the cake sit in the pans on a rack for 10 minutes. After 10 minutes remove cakes from pans by running a knife around the edge to loosen then put another rack on top of cake and flip the whole business over upside down. Gently lift off the pan and don't move the cake until it is cool. 

When you get ready to layer the cakes, slice the top dome shape off of the bottom layer to keep it flat. I will let you figure out what to do with that piece you cut off. You can imagine what I always did with it and it did not involve the waste basket!

Do not judge the frosting by the ingredients! Just remember, this is sometimes food, not every day food. I can not imagine who dreamed up this recipe and thought it might taste good, but it does! I don't think a slice or two of this cake at birthday time can clog one's arteries in an instant. Moderation is key!

Stir constantly while cooking the flour and milk. Using a whisk will prevent lumps, but you will get a blob in the center of your whisk. Start with the whisk and part way through trade it for a wooden spoon. Let this cool to room temperature before proceeding.

Beat the butter and sugar till very light and fluffy before adding the paste then beat it till you think it is done, then beat it some more. You want this so light that you can't feel the grains of sugar at all. You want silky smooth, not gritty.

When you get this cake done, have a party, call some friends, share it. DO NOT EAT IT ALL YOURSELF!

Sam's Red Velvet birthday cake 2010, his 60th birthday.


We celebrated Sam's 61st birthday, last year, about a week early, before Rachel left for her last year at Knox. Sam was able to request crab legs and steak along with the Red Velvet and that's what we had. Sam and I left for our first trip to Duke University's brain tumor center two days before his birthday, on the first day of school my first year of retirement. Sam was very sick. On his birthday he received the chemo treatment that brought him nearly instant relief and later that same day we flew home. It wasn't the easiest travel with 3 flights on chemo day but we were being chased by the hurricane Irene. 

He continued to improve in the days and weeks to come. This treatment bought him enough time that we really had some great months together. I have considered that trip to Duke to be one of the best birthday gifts of Sam's life. It was a miracle. I wish it could have lasted longer, but it was a blessing, indeed!

I will celebrate Sam's life with Abby, Rachel and Kyle. We plan to enjoy a meal (always!) and a visit to a cupcake shop where we can each choose our own "birthday cupcake". We might also play some mini golf; Sam would love that!

We continue to adjust and heal as we continue to miss Sam. Writing about Sam is healing for me, so thanks for reading. 

Isaiah 41:13 ~ For I the LORD your God, hold your right hand; it is I who say to you, "Do not fear, I will help you."