Thursday, February 21, 2013

Chicken Cordon Bleu And A Bonus Recipe, Too.

Chicken Cordon Bleu might sound intimidating, but believe me, it isn't. Simply put it is chicken stuffed with ham and cheese, which is a very nice combination. The presentation is on a dinner party level, but it is easy enough to make for a family dinner. Once you have made this a time or two you won't even need to refer to the recipe; you can just assemble a few ingredients and cook! So, let's get on with it . . .


Chicken Cordon Bleu

6 boneless skinless chicken breast halves
6 slices Swiss cheese
12 thin slices deli ham
2 eggs, beaten
3 Tbsp. flour
1 tsp. paprika
3 Tbsp. olive oil
3 Tbsp. butter
1/2 cup chicken broth
1 Tbsp. cornstarch
1 cup heavy cream

Preheat oven to 350 degrees. Pound chicken breasts to 1/4" thick. Place ham and cheese on chicken. Roll up and secure with toothpicks.

Heat butter and olive oil in large skillet over medium heat. Dip each roll in egg, then roll in flour mixed with paprika. Cook until all sides of chicken are lightly browned. Transfer chicken to a 9" x 13" baking dish.

Combine cornstarch with heavy cream, then add chicken broth. Add to drippings in the skillet and cook until slightly thickened. Pour over chicken. Cover. Bake 20-25 minutes until chicken juices run clear.

Pull out the toothpicks before spooning sauce over chicken rolls to serve.


A Little Cooking Lesson . . .

Do not skip the pound the chicken step! I use a meat mallet, but if you don't have one you can use the heel of your hand, a skillet or even a rolling pin. The idea is to smack it until it is thin and flat and is much more spread out. Do not pound holes into the chicken just get it thin and flat. It should be somewhere between 1/8" and 1/4" thick. 

Lay the 2 slices of ham out overlapping and put the cheese slice in the center. Now fold the edges over to enclose the cheese. Place the wrapped cheese in the center of the flattened chicken and fold the sides of the chicken over the ham/cheese slice then roll from one end to the other. The ham/cheese should be enclosed completely. Now use a couple of toothpicks to hold this all together. You could also tie it with string if you would rather, but I find the toothpicks work well. Repeat for all 6 chicken breasts.

Heat the butter and the olive oil:  using the two together is perfect! Butter gives a fantastic rich flavor, but used alone it will burn. The olive oil has a much higher smoke point and tempers the butter so used together you will get the flavor of the butter without it browning too much. How nice!

Put the beaten eggs in one bowl and mix the flour and paprika in another. Dip first in the egg, then in the flour. The egg sort of glues on the flour. Don't crowd the skillet. Give the chicken some room to breathe as they brown. Doing 3 at a time is better than shoving them all in on top of each other. These will not be cooked through, simply browned on the outside to develop some flavor. 

After pouring the sauce over the chicken rolls be sure to cover the dish. If your dish doesn't have a cover, use some foil, but covering will keep it all nice and moist. 

Oh, such a yummy chicken dish! Serve it along with a nice green salad, and your choice of rice, potato or bread. Add a beverage and some great company at your table and you have a dinner to savor.

Bonus Recipe!

This is an add on because I don't want to forget about it! The last time I had dinner with some great friends one of their children requested deep fried shrimp. Since I hadn't made this for years and years, maybe never, actually, I had to go on a recipe hunt and oh, boy, I found a good one! Japanese Style Deep Fried Shrimp.

You can find the recipe here and follow the directions. In honor of Fish Fry Lenten Fridays, try this recipe! I can hardly wait for a reason to make it again.


For this dish, put the flour in one bowl, the eggs in the second bowl and the bread crumbs in the third bowl. The flour first dries up the shrimp so the eggs will stick. The eggs then glue on the bread crumbs. It all works so nicely! Be sure to use the Panko style bread crumbs for the most crunch. 

Always enjoy good food!


Sunday, February 17, 2013

Fruit Salad

Today's post was inspired by a simple question from my son-in-law, Kyle, who asked me how I cut the orange in the fruit salad so there was none of the tough membrane on the sections. With the help of some photos, I'll attempt to show you how I cut some of my favorite fruits. First things first, here's the recipe for my all time favorite fruit salad . . .

Fruit Salad

1/3 cup sugar
2 tsp. cornstarch
2/3 cup orange-pineapple or pineapple juice
1/2 tsp. vanilla
1 pineapple, cut into tidbits
1 quart strawberries, stemmed and sliced
4 red apples, cored and cut into bite size pieces
2 cups green grapes, cut in half
4 firm bananas, sliced

To make dressing, combine sugar and cornstarch in a small saucepan. Stir in juice. Stir constantly while cooking over medium heat until mixture slightly thickens and comes to a boil. Remove from heat and add vanilla. Cool completely.

Combine all fruits in a large bowl and add cooled dressing. Stir to combine. Enjoy with a large group of people.

Details, Details, Details . . .

 Don't forget, this recipe is a guideline! I vary the fruits with the season or with whatever whim I am experiencing at the moment. Remember how this all started with a question about cutting an orange? The salad at that moment had at least one orange and probably a kiwi or two and maybe no apples. Use what you like! I almost always use pineapple because I almost always want it; the same with strawberries and bananas, but the other stuff might change. Grapefruits are good, so are blueberries and even raspberries.  

Now For the Tuity-Fruity, Nitty Gritty . . .

Wash pineapple, then cut off both ends.


Stand up the pineapple and cut into quarters.
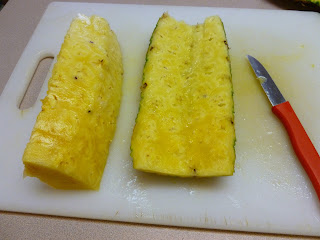
Trim off the tough core in the center of each piece.
Cut pineapple away from the outside peel of each piece.


Cut along each side and the end.
Do the same with all four pieces.
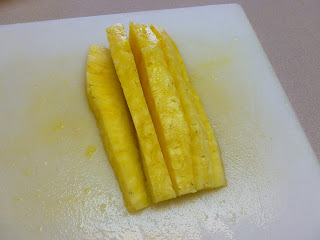
Cut each section into four long spears.
Turn sideways and cut the spears into small chunks or tidbits.
Look at all the beautiful yummy juicy pineapple!

     And the kiwi . . .

Wash the kiwi. Use a paring knife to remove the stem.


Use the peeler to remove the skin. Handle gently!
Use egg slicer (or paring knife) to slice the kiwi.

Luscious green fruit!

 Now for that orange . . .

A paring knife is all you need.
Cut off both ends of the orange.
Use the knife to cut off the peel from top to bottom.
Cut the sections away from the tough membrane by cutting right next to the membrane down to the center of the orange. Leave the knife in and twist it gently. It "should" sort of pop the section away from the membrane on the other side. Repeat with each section of the orange. 

This technique is a little easier to practice on a grapefruit because the sections are a bit bigger. After you do it a couple of times it is easier to do. Give it a try! Do not be intimidated by a little orange!

Just a little more info . . .

I buy the juice in 6-packs of little cans, found in the juice isle at our local stores. Each can is just the right size for the recipe. Don't measure, just use the whole can.

This recipe makes enough salad for Thanksgiving dinner, but if you want it for a smaller crowd the leftovers are still good the next day. The bananas are a little mushy on day two, but everything is still tasty. However, it is easy to prepare the amount of fruit you want and only use part of the dressing. The rest of the dressing will keep for at least a couple of weeks in a jar in your fridge. 

Dear reader, if you were in my Foods 2 class at NHS in this century (maybe even before), you had this salad on Salad Lab day and you probably enjoyed it then. It was one of the all time favorite, most asked for recipes. I probably made more copies of this recipe than even the Cinnamon Roll or Chocolate Chip Cookie recipes.

I hope you enjoy this recipe as much as I do. My family, many family friends and the After School Club at church have also enjoyed this over the years. It is time tested and worth passing around.