The Crust
3/4 cup warm water (105-115 degrees)
1 1/4 tsp. yeast
1 tsp. sugar
1/2 tsp. salt
1 3/4 cup all purpose flour
Stir yeast and sugar into warm water. Let sit for about 5 minutes or until foamy. Add flour and salt and stir into stiff dough. Add a bit more flour if necessary to make a stiff dough.
Turn onto floured counter and knead till dough is a smooth elastic ball. Put dough into a well oiled bowl and turn over to oil the top. Cover and let rise for at least 20 minutes.
This is enough dough for 2 small grilled pizzas or 1 large pizza baked on a pan.
 |
Get Yourself ORGANIZED
While the dough is rising you will have time to get everything organized and ready. If you are using charcoal, get it started now. If using gas, you can hold off for a bit. Cut your toppings. I like to use lots of veggies and I cut them small. I don't usually use meat as this pizza is best kept light on the grill. I have used sausage and pepperoni, but use sparingly and cut into small pieces. Open the pizza sauce can and have it ready with a spoon, put your cheese in a bowl, easier to get at than in the bag. You will also need
- a spatula and maybe tongs
- a wash cloth to wipe your oily hands
- another pizza pan or cookie sheet for your cooked pizza
- a pizza cutter or scissors to cut
You can let the dough rise until it is double in size, but you don't have to wait that long. Wait at least 20 minutes. You want the gluten to have time to relax, so the dough is more workable.
I like to put all my toppings on a plate, with the peppers in one pile, the red onions in another pile, the ribbons of spinach in another pile, the olives in another and so on. You get the idea. If they are all on one plate (or two) it is easier to manage to apply quickly. I have a big tray that holds my plate of toppings, my bowl of cheese, the can of sauce, etc. You want it all handy to the grill. Once the dough is ready and you have things set up it is time to flatten HALF of the dough onto the sprayed pizza pan.
 |
| Remember, this is only half the dough and it will not fill the pizza pan. |
Ready To Grill!
Your grill should be heated but not hot! I turn my dials just below half way and have the heat just under 300 at the lowest and up to 375. Anywhere in that range works, but if you have the grill hotter than that the pizza cooks too fast. So don't. If using charcoal, make sure the coals are well burned and completely gray. Spread them out well, so the fire is not too hot.
Now take a deep breath, get the pan of dough as close to the grill as possible (have someone else hold it), grab the dough with both hands and flop it directly onto the grill grate. Yes, you read that right. No, it will no longer be in that beautiful round shape. It is ok! Don't sweat it. As long as it is relatively flat it is perfect!
 |
| This looked sort of round on the pan, but by the time it hits the grill it is a bit stretched out! |
Wipe off your oily hands, wipe the sweat off your brow, take a swig of whatever you are drinking and high five your good buddy standing by! You did it! Give it a few minutes, then peek underneath.
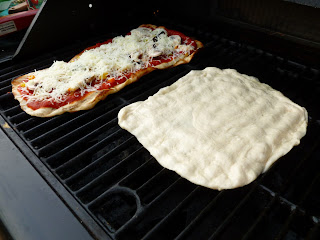
Soon it will be a firm, half baked pizza crust. When it is lightly browned use your tongs, a spatula or your bare hands and flip it over.
 |
| Starting to look good, isn't it? |
Here's where the organization pays off. You need to work quickly.
- spread on the sauce
- add the veggies
- sprinkle the cheese
- close up the grill and let it bake
 |
| Still needs a few more veggies and some cheese, but the bottom is baking, so work quickly. |
Once pizza number one is cheesed and is baking, flatten the other half of the dough and add it to the grill. About the time one pizza is done the second can be flipped and finished.
 |
| No two pizzas are alike. |
Once the cheese is bubbly and the bottom is browned you can move it to the pizza pan, cut it, and eat it!
Kick Back and Enjoy!
Time to eat! Bring out some good summer foods and whatever beverages you like. Sit around the table, inside or out. Enjoy this delicious food with people you love. What a wonderful world!
You can experiment with some delicious flavor combinations. I made a new one the other night. I skipped the sauce and brushed on olive oil instead. I added chopped sundried tomatoes, black olives, red onions, fresh basil, and a little garlic, then feta and mozzarella. Oh, baby! That was yummy. We ate it first and called it appetizer pizza.
I have some ideas for dessert pizza, too, but I haven't yet tried them. How about a little cream cheese and some strawberries and peaches?? I will let you know soon.
In the meantime, have fun and play with your food!


No comments:
Post a Comment