My sister Karla and I have tried to keep up her tradition but between us we don't come close to Mom's total! I think we have come closer in quality than in quantity and for that I am grateful.
I have had a couple of people ask for tips and advice since I shared the recipe on my Facebook page yesterday. I decided this would be the best place to do just that. After all, my daughters and Karla's might some day need this advice, too.
 |
| Don't they look scrumptious? |
 |
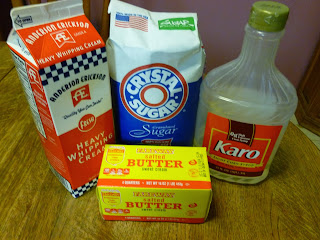
| All that deliciousness from these simple ingredients. |
Audrey's Cream Caramels
2 c. sugar
3/4 c. light corn syrup
1/2 c. butter
2 c. cream
Mix first 3 ingredients plus 1 cup of cream. Bring to a boil, stirring constantly. Then stir in rest of cream. Stir frequently as mixture begins to thicken, constantly as it darkens. Cook to 254 degrees. (A little dropped into cold water forms a hard ball.) Pour into buttered 7 or 8 inch square pan with 1/2 cup nuts scattered on the bottom if desired. when cold, cut into squares.
For chocolate caramels, add 2 squares of unsweetened chocolate with first ingredients.
The rest of the story . . .
Mom's hand written recipe credits the Betty Crocker cookbook, probably the one she received as a wedding gift in 1951.
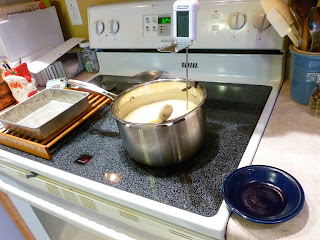
Before starting to cook, get everything set up. I have a heavy 4 quart saucepan. You need one about that big. A candy thermometer is helpful. I splurged on a digital one a couple of years ago and have been glad every time I make another batch. I use a wooden spoon to stir.
Butter the pan and set it on a cooling rack. Butter another small dish and set it aside.
Although the recipe says to cook to 254 degrees, I pull it off the heat at 252. The thermometer moves very slowly until it reaches 240 degrees. Then it begins to move a little faster and by the time it reaches 250 degrees it is climbing quickly. At 252, immediately pour the mixture into the buttered pan, but do not scrape the sauce pan! Scrape the last bit out of the pan into the little dish you have buttered. That remaining mixture has usually cooked to 254 degrees or beyond simply by remaining in the hot pan. I will leave to your imagination what you should do with this last little bit.
The caramel is very hot. Take care not to drop any on your skin. It will burn and blister. I speak from experience. Be careful! Whatever you do, do not lick the spoon!
 |
| Buttered pan on cooling rack, small buttered dish near by, thermometer in place |
 |
| Mixture is light colored when cooking begins. I begin with medium high heat. When mixture boils, turn to slightly below medium. |
 |
| As mixture darkens, stir constantly. Now you are making progress! |
 |
| Here's that last bit I put in the little dish. You can see that some of it is darker. It will be more hard than what is in the pan. |
Once the pan of caramel has cooled it is time to cut the caramels. My Dad was always the cutter and Mom was the wrapper. They wrapped each caramel in little squares of foil. Each one was wrapped like a tiny present. Now that I think of it those little silver cubes sort of go along with the story of extravagance. Karla is true to tradition as she wraps her caramels in foil. I have switched to waxed paper. I find it easier to wrap and easier to unwrap as well. Your choice.
I tear off strips of waxed paper and cut it into fourths. I pile up about 10 and cut them altogether. I do this while watching TV and I keep them in a plastic container, just waiting for action.
 |
| My little pieces of waxed paper waiting to wrap caramels. |
 |
| All wrapped up and waiting to be given away. |
I am a little bit ahead of myself. The caramels need to be cut before they can be wrapped!
Turn the pan upside down on a cutting board. If it doesn't fall out of the pan you need to put a thin metal spatula down the side of the pan and loosen it up. You might have to do this on all 4 sides. It will come out. Trust me!
 |
| Cutting is a bit tedious, but well worth it! |
I use a sharp knife with a long blade. I cut across into 12 strips, sometimes 13 if it works out that way. Then each strip is subcut into 12.
These keep well for several months, maybe more. I store them in tins or plastic containers with tight fitting lids. I usually store in a cool spot like my basement or my garage.
You will know if the mixture is gets overcooked. It will be difficult to cut. In fact it might shatter or crack. In this case be very careful of dental work!
I can't help but remember Mom while making these caramels. I can see her standing by the stove stirring. I also have fond memories of watching my parents cutting and wrapping caramels late at night as we kids trotted upstairs to bed.
I love hearing comments from people who recall enjoying Mom's caramels. I doubt if she had any idea what a tradition she was birthing back 60 some years ago while she was pouring over those new cookbooks choosing her Christmas recipes. I guess that's the way traditions are born, completely unplanned, simply a success that is repeated.
Enjoy!
No comments:
Post a Comment