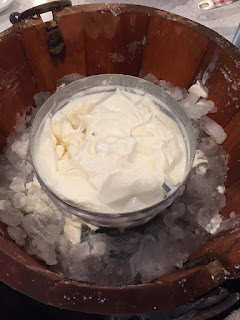
When we were growing up homemade ice cream was nearly a staple! At least it was made for many family gatherings and meals. Sometimes the gathering was because there was homemade ice cream!
So, during that 4th of July lunch the discussion eventually revolved around the question of whether or not THE ice cream freezer still works. Only one way to find out! You see, our parents have been gone from this life for 6 and 7 years, so we know it hasn't been used in more than 7 years. Eventually, all the parts, the recipe, and the ingredients were located and on July 5th the great ice cream social took place.
The recipe . . .
Vanilla Ice Cream
6 eggs, beaten
3 cups sugar
1 quart heavy whipping cream
3 Tablespoons vanilla extract
Whole milk
Combine the beaten eggs, sugar and 4 cups whole milk in a heavy saucepan. Cook over low to medium heat, stirring constantly till mixture reaches 160 degrees F. Remove from heat, cover, and cool completely.
Pour mixture into the can of a 1 1/2 gallon ice cream freezer. Add the cream and the vanilla. Pour in whole milk until mixture is about 4 inches from top of can.
Put the dasher into the can and put put on the lid. Insert into the ice cream freezer bucket. Add 3 inches of crushed ice, then 1/2 inch of rock salt. Repeat layers of ice and salt, maintaining as closely as possible the 6 to 1 ratio of ice to salt, until bucket is nearly full. Put the motor on top, locking everything into place. Turn on the motor and add more ice and salt to completely fill the bucket. Add cold water, filling in the cracks. When water starts dripping out the whole near the top of the bucket you have enough. When the motor starts to slow or balk the ice cream is nearly done. If motor stops, unplug immediately.
A bit more info . . .
Be sure to beat the eggs until you can not distinguish the yolk from the white.The cooking process is necessary to kill any potentially present harmful bacteria.
This cooked egg and milk mixture is referred to as custard. The custard must be completely chilled to make ice cream. Plan ahead and cook it the day before or in the morning for evening ice cream. If by chance you are short on time (and who isn't?) you can speed chill by putting the custard into a bowl. Put ice and water into a larger bowl or the sink and float the bowl of custard in the ice water. Stir often until mixture is chilled. You might need to add more ice to keep the water chilled. When chilled pour it into the can and proceed.
How much milk? This is where the recipe gets a bit sketchy. You might find a recipe somewhere that tells exactly how much milk, but my Mom's recipe is less exact. She always stuck her finger inside the can and poured the milk in till it nearly reached the tip of her finger. My sister Pam must have measured Mom's finger as her recipe says to stop 4 inches from the top of the can. Don't fill the can. As the ice cream freezes, air is incorporated and the ice cream expands.
 |
| A ruler might be a better idea! |
I like to return the lid and let the ice cream "ripen" for a bit. It will continue to harden just a bit. You can hold the ice cream for hours if you wrap it with a blanket.
This recipe is for a large ice cream freezer, 1 1/2 gallon. If your freezer only make one gallon you will need 4 eggs, 2 cups sugar, 3 cups cream and 2 Tablespoons vanilla. I will let you do the math for any other size freezer.
I could go on and on with ice cream stories and tidbits, but I know you want to make ice cream! Happy freezing!


No comments:
Post a Comment