Tuesday, May 14, 2013

Morel Mushrooms!

One of my childhood memories of springtime is mushrooms! Not just any mushroom (although back then we knew of no others) but morel mushrooms, those special little morsels that Dad could find in the woods by simply pushing back a few dead oak leaves, picking them and plopping them in his sack. Some years he would find bunches of them, other years not so many. Dad loved to be outside, farming, fishing, and walking in the timber. My farmer brothers have acquired these habits as well, with one brother fishing every chance he gets and the other walking in the woods and noticing every wonder growing there. 

Today happened to be an excellent day with foods supplied by these brothers of mine. I had fish caught by Dennis for lunch and mushrooms found by Doug for supper! How about that!

Doug's morels!

Step 1 . . .

Gotta get rid of the dirt and bugs! So, put a tablespoon or so of salt in a bowl of water and add the mushrooms. 
Swish them in the salted water and you will see
dirt and maybe even a bug or two. 

Step 2 . . .

There is usually more than one way of doing things. This is how I prepared my mushrooms today, but there are other possibilities. 

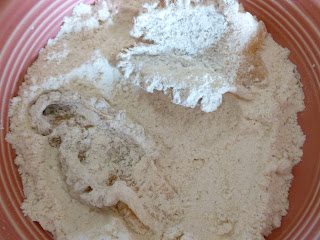
While the mushrooms are soaking, prepare the breading. Put flour in one bowl and season with some salt, pepper and garlic powder. Crack an egg into another bowl and mix it up with a fork or a whisk. Put Panko breadcrumbs in bowl number 3. Now you are ready to drain the mushrooms, cut in half, and blot dry with paper towel.


Flour, beaten eggs, panko breadcrumbs

Next, bread the mushrooms . . .

Breading, simply means covering the food with crumbs for a crispy delicious coating. You want the crumbs to stick and eggs are the trick for this. 

First dredge the mushrooms in the seasoned flour, then dip them into the egg mixture and finally into the crumbs. Put the breaded mushrooms onto a cookie sheet or a plate until ready to fry. 


And finally, here they are breaded and ready to fry. All those wonderful crumbs will fry up crispy and delicious.


Time to fry . . .

I like a heavy skillet, a combination of oil and butter, and just below medium heat. Give the skillet a few minutes to preheat and you are ready to go.

When the butter is melted and the skillet is hot add the mushrooms. You should hear the sizzle of frying when the mushroom hits the skillet. If the first one doesn't sound off, wait till you hear it before adding the others. Do not crowd the skillet and flip each one over as it turns golden brown. You will need to add a little more fat with each batch fried.
Please pardon the glare, but look at that wonderful golden crust!
Once the mushrooms are golden on both sides, remove to a plate, continue frying, then enjoy these seasonal delights! This, my friends, was my entire supper this evening. If you want the truth, there were a few more as I took this photo while the last ones were still frying. There aren't many foods worthy of becoming an entire meal. In the summer I might eat nothing but corn for a meal or two and sometimes on a wonderful lazy Sunday popcorn might be my entire evening meal and in the spring, on a good year with the generosity of a brother, morels can join this select group of foods. Yum, yum!


And now for a bit of science just because I can . . .

I like a little flour for the first step of the breading process to absorb any lingering moisture. The egg can be diluted with a little water or milk, but don't get it too runny. The proteins in the egg stick together as they are heated and that is what "glues" on the crumbs. If there is too much added water, steam will be produced and that will make the coating more soggy and tough rather than crisp and crunchy. 

I like the crispiness of Panko breadcrumbs, but you can use cracker crumbs, breadcrumbs, or many other dry crunchy foods. Experiment with possibilities like cereal, potato flakes or whatever your neighbors, family and friends insist is the best. 

The flavor of butter is great, but it has a low smoke point, so temper it with some oil for best results. Oil without the butter is also perfectly acceptable, but butter alone will burn, even at medium heat. So if you really want to use only butter, keep the heat LOW.

I use as little fat in the skillet as possible, because it all seems to be absorbed into the crumb coating. There is a fine line between too little and enough. Not enough will yield a white crust rather than golden. 

This basic process can be used for frying lots of different foods. Other vegetables can be fried in this manner. Shrimp is delicious, too. I don't fry foods often, but when I do, I want it golden, crunchy and flavorful! Don't be afraid to give it a try, but not to often, please! 


Saturday, May 11, 2013

Baking In My New Kitchen

Who knew Mrs. Clark would be moving into her new house on the day that it snows in May! Always an adventure, but now I am here, unpacking and feeling right at home. My kitty seems to have adjusted as well as I am and my girls feel at home here, too. It is home because we are here. It is home because I brought my favorite things and it is home because all of our memories of Sam came with us. Although my girls no longer live here, there is a place for them and when they are here it feels like we are at home and that is a very good thing. 

Graduation Season

Today was my first graduation party. Part of my standard graduation gift is a little bag of my favorite chocolate chip cookies along with the recipe, all tied up with a bit of ribbon. So today, I baked my first batch of cookies in the new oven. I now have an electric range when I have always had gas at the old house. My classroom had electric ranges so I am not completely unfamiliar. In a perfect world I would be cooking on gas and baking with an electric oven. Since I seem to have a long history of making do, I am just fine with now using electric and this one seemed to bake these cookies just right! Yippee!

Here's the cookies I baked earlier today.

Mrs. Clark's Favorite Chocolate Chip Cookies

1 cup butter
1/2 cup shortening
1 1/4 cup sugar
1 1/4 cup brown sugar
1 Tablespoon vanilla
2 eggs
4 1/4 cup flour
2 teaspoons baking soda
1 teaspoon salt
12 oz. semisweet chocolate chips

Preheat oven to 350 degrees. 

Using electric mixer, cream together butter, shortening and sugars in large bowl until thoroughly combined. Add eggs one at a time mixing completely after each. Add vanilla.

Sift together dry ingredients and add to creamed mixture, stirring slowly until completely  combined. Stir in chocolate chips. 

Drop dough by rounded teaspoons about 2 inches apart onto ungreased cookie sheet. Bake 9-10 minutes until edges of cookies are set but centers are still soft. Allow to cool several minutes on cookie sheet before removing. Allow to completely cool before storing in air tight container. 

A few things I have learned along the way . . .

A little shortening in cookies adds a chewy texture. Butter gives flavor and a crisp texture so the mix of both is wonderful. No two margarines are the same, so you might get inconsistent results if you use margarine instead. If you insist on using it, you will have to experiment with different brands to find what works. I can't insure the outcome of this recipe except with butter and shortening. 

Be sure to completely mix the fats and the sugars; get it nice and fluffy before adding the first egg. Do not try to save time by adding both eggs at the same time. They will absorb much better one at a time. 

Take time to sift the dry ingredients. At the very least measure them into a bowl and stir them together with a wire whisk. Sifting or whisking will add some air as well as getting those small amounts distributed throughout the flour. 

Speaking of flour, before you even measure it, take a big spoon and fluff it up in your bag or canister. Then gently spoon it into the measuring cup and level it off. Do not settle it or pack it into the cup as that will actually add too much flour to your dough, making your cookies tough and dry. Nobody wants that!

The recipe calls for semisweet chips, but I have used dark chocolate and I have also used milk chocolate chips. Each tastes a little different, but I like them all. I have never met a chocolate chip I didn't like, but please do not buy the ones labeled "chocolate flavored chips". Use the real deal, whatever brand you like. 

I use a cookie scoop, but you can scoop the dough onto one spoon and push it off onto the pan with another spoon. I always put 12 cookies on the pan, three across in four rows. I usually get about 60 cookies.

The recipe says the pan should be ungreased, but I always line with parchment paper. Clean up is a breeze and the cookies never stick. Do not spray or grease the pans. The cookies are likely to spread on a greased sheet. 

Now, whatever you do, do not over bake! Bake only until the outside edge begins to firm up. The center will still be soft and un-done, but it will finish baking on the cookie sheet. I take the pan out of the oven and set it on top of the stove. Just before taking out pan number two, I remove the first cookies to a sheet of wax paper on the counter. 

I bet that was more than you ever wanted to know about baking cookies! Happy baking!

As long as we are talking about sweet treats . . .

Here's something Rachel taught me about. She found it in Iowa City and I had some at her house. Oh, golly, it was good!


Oh, my goodness! I have no business knowing how delicious this ice cream tastes! Let me tell you, when I saw it at our local Hy-Vee and that little carton jump into my cart I knew I had a new guilty pleasure. There are many delightful looking flavors and I have only tried 2, but I think by the end of summer I might have experienced a few more. 

I believe the name of this creamy yummy-ness is 2nd Street Creamery, but since the carton is no longer in my freezer I can't go look for sure. The ice cream is very creamy and smooth and it is chock full of whatever topping and candy is added into it. I highly recommend you give it a try when you are looking for a special little treat.

Next blog will be about something more healthy, but equally delicious!

One Last Thing . . 

Happy Mother's Day one and all. I had a wonderful mother, who I miss very much. I loved her yet she drove me crazy at times. She was such a character! She never knew a stranger and loved to talk to anyone. She was a champion promoter of our little community. She loved God, her family, her garden and good food. I learned about the power of food and the wonders of family around the table from her. She had a huge appetite and ate more than my Dad on a regular basis. I just wish I had been blessed with her metabolism instead of only her appetite! I miss her, but I know she is having a blast in heaven!