Monday, December 2, 2013

Cinnamon Rolls

This evening as I was having dinner with some of my quilting friends, Mrs. Clark was gently reminded that it has been quite some time since she has written about her kitchen fun. So tonight is the night. I will take a break from the Christmas decorating and write about one of my favorite things to bake. . .

Cinnamon Rolls!

I don't make these often, but they make a real treat on special occasions and plenty of special occasions are coming up. These take a commitment of time, but can be done over the span of two days if you wish. 

1/4 c. warm water (105 - 115 degrees)
1 pkg. dry yeast
1 tsp. sugar
3/4 c. warm milk
1/4 c. sugar
3/4 tsp. salt
1/4 c. butter, very soft or melted
1 egg
3 to 3 1/2 c. flour
for filling:
1/4 c. soft butter
1/4 c. sugar
1 Tbsp. cinnamon
for frosting:
2 c. powdered sugar
2 Tbsp. soft butter
1/3 tsp. vanilla
3 Tbsp. milk

Dissolve yeast and 1 tsp. sugar in the warm water. Let stand about 5 minutes or until a bubbly foamy layer develops.

Combine the warm milk with sugar, salt, soft or melted butter, egg and 1 1/2 cups of the flour in a large mixing bowl. Add the yeast mixture and beat until smooth. 

Using a wooden spoon, gradually stir in remaining flour. Use enough flour (usually 1 1/2 to 2 cups more) to make a soft dough which leaves the sides of the bowl in a ball, adding more flour as necessary. 

Turn dough onto a floured surface. Knead 5 to 10 minutes, until dough is smooth, elastic, and no longer sticky.

Return dough to well oiled bowl, cover and let rise until double in bulk, about 1 hour.

Punch dough down with fist. Roll into a rectangle about 12 inches wide and 18 inches long. Spread with 1/4 cup soft butter. Sprinkle with mixture of cinnamon and sugar. Roll into a 12 inch log. 

Cut into 12 pieces with dental floss by wrapping floss around the log, crossing the floss, and pulling it tight. Place the rolls in a greased 9" x 13" pan. Cover loosely with waxed paper or a towel and let rise till rolls double in size. 

Bake for 20-25 minutes in 350 degree oven. Rolls will be lightly browned and sound slightly hollow when done. 

Combine ingredients for frosting; stir until creamy, adding a few more drops of milk if necessary. Spread over rolls.

A few things I've learned along the way . . .

Dissolving the yeast in warm water is called "proofing" the yeast. It becomes active, starts to grow and produces carbon dioxide which makes the dough swell up and become light and airy. If the water is too hot it will kill the yeast. If the water is too cool the yeast will not become fully active. Use a thermometer to check the water temp to be safe.

How much flour? If you don't use enough the dough will be very sticky and difficult to work. If you add too much the rolls will be dry and tough. I have found that "enough" is when the ball of dough first begins to roll around in the bowl without sticking to the sides. I know that isn't a very scientific explanation, but after you do this a couple of times it becomes more obvious how much is enough.

Kneading . . .

Put a handful of flour on your counter or table top and spread it around. Dump the dough out onto the flour and put a little flour on your hands. Now FOLD the dough i half and lightly PRESS it down. Then TURN it 180 degrees and repeat the process. Just remember 3 little words: fold, press, turn.

Fold, Press
Turn, then repeat. Fold, press, turn.
Oil your bowl. Put the dough in top side down. Roll it around so the top is coated with oil, then turn it over. Cover the bowl and set it aside to rise.

Oiled dough in the bowl.
Dough is doubled in size.
Punch it down.

From ball of dough to sheet of dough . . .

Put some more flour on your counter and get out your rolling pin. Dump the dough onto the floured counter. Flour up your rolling pin and roll away! Roll from the center out and pay attention to the corners. Work at making a rectangle. Since you are starting with a round ball of dough it naturally rolls into an oval. You are the boss of this dough and you want a rectangle. It can be done, but you need to take charge. Give a few extra rolls out to those corners and use the side of your hand to push the top and sides back in to help form the sharp edges. Just work at it and don't give up! Lately I have been skipping the rolling pin and have just been patting the dough with my hands. Either way works. Use the method you prefer.

You want 12" x 18" or so.

Spread on the butter and get it all the way to the edges!
Add the cinnamon and sugar. I use a shaker, but a spoon works, too.

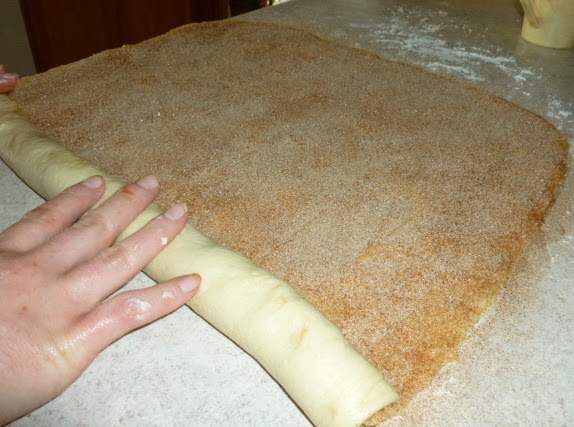
Start at the narrow end and roll it up.

The rolled up log.

Cut the log . . . 

The log can be sliced with a knife, but it tends to smash the log. Try a piece of dental floss or thread. Center it under the log, pull up the ends and cross them tightly. It will cut right through the log and retain the shape. 

Cut it in half, then fourths. Then cut each of the fourths into 3.
You will have 12 relatively even rolls.
Space the rolls evenly in the pan.

Let the rolls raise until they grow together or are double in size.

Ta Da! The finished product . . . 

I can almost smell the cinnamon and the yummy bread baking smell as I look at this picture! I often made these for holiday breakfast or on some special day like Father's Day. It was usually a special day. I think any day can be made into a special day with these in the house. What do you think?

Oooooh, aaaaah! Yum!

Coolrise, two day method . . .

Once you get the rolls in the pan cover with waxed paper and put in the refrigerator. The rolls will slightly rise over night. Get them out in the morning (sometimes I do this VERY early, like 3 or 4 AM if I wake up) and allow rolls to finish raising. 

You might have to help them along if you want to eat them before very late morning. The refrigerator slows down the carbon dioxide production of the yeast. You need to warm up the rolls so the yeast wakes up and gets to work. Here's how I do it.

I turn on the oven and preheat it to 200 degrees. Then turn it OFF. Now put the pan of rolls in the warm oven. Leave them for about an hour or until rolls have raised. Remove from the oven. Preheat. Bake.

Here are some other ways the dough can be gently warmed: 
  • Fill the sink with HOT water and put a rack over the top of the sink. Set the pan of rolls above the hot water and drape a towel over to hold in the heat. Replace the water as it cools.
  • Set the pan of rolls in front of a heat register. 
Special thanks to my niece Hannah for helping me make the above batch of Cinnamon Rolls. This was the first, but not the last batch she made.


Scooter is quite content in my kitchen!

Next up . . .

It is now the season when my kitchen goes into full cookie baking mode interrupted only for making batch upon batch of Christmas Caramels. Stay tuned!


Tuesday, September 17, 2013

White Bean And Chicken Soup

As soon as the weather cooled down a bit my mind went to soup. Well, not literally, but I did start to think about soup recipes. Soup and recipes used together is a bit of a stretch for me because usually I just make my own soup. Really, you just need some sort of broth or liquid, some vegetables, maybe some meat or poultry, seasonings, maybe a starch and a bit of creativity. However, I have used a couple of different recipes for white soup or chili and yesterday I used a combination of several and a couple of twists of my own to come up with what I am calling White Bean And Chicken Soup. It isn't thick enough to be considered chili in my mind, but you could make it so. 


White Bean And Chicken Chili

1 lb. boneless skinless chicken breasts, cut into 1/2 inch cubes
1 large onion, diced
1 1/2 tsp. garlic powder
1 Tbsp. olive oil
3 cans (14.5 oz) chicken broth
2 cans Cannelini beans, drained and rinsed
2 cans (4 oz) chopped green chilies
1 1/2 cup corn 
1/2 tsp. salt (optional)
1 1/2 tsp. ground cumin
1/2 tsp. paprika
1 tsp. dried oregano
1/2 tsp. ground coriander
1/4 tsp. black pepper
1/4 tsp. ceyenne pepper
1/2 cup sour cream

Heat oil in a large saucepan over medium heat. Add chicken, onion, and garlic powder to saucepan and cook until chicken is no longer pink. Add broth, beans, green chilies, corn, and seasonings. Bring to a boil, reduce heat and simmer, uncovered, for 30 minutes. Just before serving, stir in sour cream. Yield: 8 servings

Make It Your Own . . .

Your soup doesn't have to be like my soup! If you want it to be thicker, use two cans of chicken broth or even just one. Add in one with the beans and other ingredients, then add one or two more if desired. 

If you want it more spicy, ramp up the ceyenne or add in a splash or two of hot sauce. You could chop up a jalepeno and cook it with the chicken. 

I like to stir in the sour cream, but you might want to put it on the table and use as a garnish instead.

Add a tablespoon or so of fresh lime juice to brighten up the flavor just a bit.

Cannelini beans are the creamiest of the white beans, in my opinion. For a creamier texture put one can of the beans and a bit of the broth in a blender or food processor before adding to the soup. It will make it the soup more creamy and less chunky. You can use any other white bean in the soup but the Cannelini works best if you want to blend some of them. Otherwise, feel free to try white kidney beans, great northern beans, or even garbanzo beans.

You might want to omit the salt and add it later to taste. There is a lot of salt in the chicken broth and you might not need it.

Garnish To Your Heart's Desire . . .

You can serve with corn chips, shredded cheese, sour cream, or salsa. How about adding in a few bits or diced tomatoes, green peppers or diced onion?

And Then . . .

One of the things I have always liked about making soup is the fact that it is usually cook once, eat more often. Soup in almost any form is as good or better the second or third day. Soup reheats easily on the stove or in the microwave. Most kinds of soup freeze well, too, in a freezer bag or a plastic container. 

Enjoy! Soup's on!


Wednesday, July 24, 2013

Website Fascination

Today's post will be short and sweet, but I wanted to let you in on my new favorite recipe source.


After Hannah and I went on our hunt for (and found!) the most delicious Black Bean Burger we were totally ready to find more super duper ways to prepare quinoa. 

You probably already know that quinoa (pronounced keen-wa) is a whole grain rich in vitamins, minerals, and fiber with a decent amount of protein for a grain.  

Hannah found this great site and now you can find it by clicking here http://www.thegardengrazer.com/2013/01/crazy-for-quinoa.html

Recipe #1

I first made the Mexican Quinoa Salad because I like all things remotely Mexican and I had everything on hand. I have since found out that the dressing is also good as a marinade on chicken and I suspect on pork and fish as well. It is the taste of summer, refreshing, delightful and down right yummy! I would even like it on a green salad. 

Back to the quinoa. How can you go wrong with corn, onion, peppers, tomatoes, and black beans? I wanted to eat it just like that then I remembered the whole idea was to try a new way to eat quinoa and let me tell you, it did not disappoint!

Recipe #2

Next I made the Quinoa Vegetable Salad with Lemon-Basil Dressing because I am being overtaken by fresh basil. It is very similar to the Mexican Salad but with garbanzo beans instead of black beans and of course it has a different dressing. As long as I have basil growing this might be my new favorite potluck salad.

Next Plan

I believe before the week is over I will try the burritos as well and maybe my own version of the Pizza Bites. I might even venture past the quinoa collection and into the other recipes on this site. 

No pictures today because I was too busy enjoying the salads, but don't worry, as there are wonderful photos at the garden grazer website. Check it out. 

Last Bit of Advice . . . 

Enjoy as much fresh seasonal produce as you can! The Missouri peaches are fantastic, the cantaloupes make me drool, the Iowa Sweet Corn is perfect, the green beans are growing and producing like weeds, the cucumbers and zucchini and peppers and more are coming on strong and I have heard of people getting their first few tomatoes. All this and so much more is out there begging for some good tasty eating. Don't miss it!

Friday, July 12, 2013

Black Bean and Hominy Salad

I don't recall where I found the recipe for this salad last summer, but I have tweaked it enough that now it is mine. I have forgotten lots of details from last summer, but I remember enough to know this is a great salad! I think it originally came from a magazine, but I'm not sure which one. Whenever I make it someone asks for the recipe. I decided I can kill two birds with one stone if I put it here. I won't have to hunt for the recipe, email it, or remember it on the spot any longer. I can just say, it's on the blog!

Black Bean and Hominy Salad 


1 can (15 oz.) black beans, drained and rinsed
1 can (15 oz.) hominy, drained and rinsed
1 can Mexican corn, drained
1 cup grape tomatoes, halved
1 green pepper, diced
1/2 small red onion, diced
1/4 cup fresh cilantro, chopped
1/2 medium jalapeño pepper, seeded, minced
1/4 cup fresh lime juice
2 tsp. honey
2 tsp. olive oil
1 tsp. ground cumin
1/2 tsp. salt

Combine all vegetables in a bowl.

In a small bowl, whisk together lime juice, honey, oil, cumin, and salt; pour over vegetables and toss to combine. Yields about 8 servings.

A Few Things I've Learned . . .

Dump the beans into a strainer or colander and let the liquid run off then turn on your faucet or sprayer and rinse the beans until the water runs clear. Rinse the hominy in the same way. This will eliminate some of the sodium as well as the slimy liquid in the can. Much better now. You can rinse the corn if you want, but I simply drain it.

I usually stand at the vegetable isle looking at the hominy in a bewildered way. Should I buy yellow or white. Looking at the nutrition facts didn't help, identical. I always ended up with yellow until my niece Hannah told me she made it with white (after a similar bewildering choice) and found it to be pleasing to the eye. Since then I have always used white and she is right! Pretty! As you can see though, my photo is from the old days when  the hominy was yellow. 

I don't usually measure the tomatoes. I use a couple of handful and I know I often use more than 1 cup. In the summer when tomatoes are ripe in my garden I use any size or shape of tomato I have. Just dice them up, romas, beefsteaks, or whatever. All taste great.

Green pepper adds another color to the mix, but if all I have on hand is yellow, orange or red, that is what I will use. Sometimes I have used all colors. Use what you have.

Likewise, white or yellow onions will work, but red look good, and generally, they are a little more mild in flavor and perfect for salads. If using yellow or white, I put them in the microwave with about a teaspoon of water and cook them for 30 seconds or so to take off some of that strong flavor. When partially cooked the flavor is more mellow.

If you don't like the flavor of cilantro leave it out. If I don't have fresh I use dried, but only 1-2 tablespoons as it is much more concentrated in flavor.

I wear gloves (if I think to do so) when cutting up the jalapeño. I also take out the seeds and the membrane. If you are a heat seeking pepper lover you can leave in the seeds and membrane. Be sure to wash your hands or throw away the gloves before rubbing your eyes!

I often use a 1/2 pint jar with a screw on lid to make the dressing. Put in the ingredients and shake it up.

If I am working ahead of time (even the day before serving) I put all the vegetables except the tomatoes in a bowl, cover and refrigerate. I put the jar of dressing beside it and the next day, add tomatoes, dressing, toss and serve. 

This salad is tasty with burgers, grilled chicken, or any juicy delicious grilled meat. It tastes like summer and it is just as healthy and nutritious as it is yummy and pretty. I hope you like it, too. We had this at our 4th of July feast along with grilled pork chops, a couple of other salads and some holiday food art that you can see below.

Playing with our food . . . 

Last Thanksgiving, knowing we needed some new ways to celebrate, we went on a rampage of turkey themed food art. Christmas time was more of the same but with Christmas trees and Santa Claus. Hmmm, we seem to be creating new traditions and here are our 4th of July attempts at something a little bit new. I think Sam would smile at our new way of doing things. My girls are such troopers, carrying right along with me on this. 

Oh, Say Can You See?


Star Spangled Strawberries

Serve at once or the colors tend to
blend together like this.
Don't forget that good food alway tastes better when shared around the table with those you love. Enjoy!

Monday, June 24, 2013

Grilled Pizza!

You asked for it, so here it is. Grilled Pizza! This is a lot of fun and it takes a little practice. Sam and I first made grilled pizza at least 15 years ago. We experimented a bit and loved it from the start, with its crispy crust and wonderful flavor. In the beginning it seemed like a lot of work, but the more we made it the easier it got to be. We have grilled pizza on our gas grill, a charcoal grill and over a wood fire while we were camping. We were always going to try making it in our wood burning stove in the sunroom, but that remained a dream. Enough back story, here we go.


The Crust

3/4 cup warm water (105-115 degrees)
1 1/4 tsp. yeast
1 tsp. sugar
1/2 tsp. salt
1 3/4 cup all purpose flour

Stir yeast and sugar into warm water. Let sit for about 5 minutes or until foamy. Add flour and salt and stir into stiff dough. Add a bit more flour if necessary to make a stiff dough.

Turn onto floured counter and knead till dough is a smooth elastic ball. Put dough into a well oiled bowl and turn over to oil the top. Cover and let rise for at least 20 minutes.  

This is enough dough for 2 small grilled pizzas or 1 large pizza baked on a pan. 


Get Yourself ORGANIZED

While the dough is rising you will have time to get everything organized and ready. If you are using charcoal, get it started now. If using gas, you can hold off for a bit. Cut your toppings. I like to use lots of veggies and I cut them small. I don't usually use meat as this pizza is best kept light on the grill. I have used sausage and pepperoni, but use sparingly and cut into small pieces. Open the pizza sauce can and have it ready with a spoon, put your cheese in a bowl, easier to get at than in the bag. You will also need
  • a spatula and maybe tongs
  • a wash cloth to wipe your oily hands
  • another pizza pan or cookie sheet for your cooked pizza
  • a pizza cutter or scissors to cut
You can let the dough rise until it is double in size, but you don't have to wait that long. Wait at least 20 minutes. You want the gluten to have time to relax, so the dough is more workable. 

I like to put all my toppings on a plate, with the peppers in one pile, the red onions in another pile, the ribbons of spinach in another pile, the olives in another and so on. You get the idea. If they are all on one plate (or two) it is easier to manage to apply quickly. I have a big tray that holds my plate of toppings, my bowl of cheese, the can of sauce, etc. You want it all handy to the grill. Once the dough is ready and you have things set up it is time to flatten HALF of the dough onto the sprayed pizza pan. 

Remember, this is only half the dough and it will not fill the pizza pan.

Ready To Grill!

Your grill should be heated but not hot! I turn my dials just below half way and have the heat just under 300 at the lowest and up to 375. Anywhere in that range works, but if you have the grill hotter than that the pizza cooks too fast. So don't. If using charcoal, make sure the coals are well burned and completely gray. Spread them out well, so the fire is not too hot.

  
Now take a deep breath, get the pan of dough as close to the grill as possible (have someone else hold it), grab the dough with both hands and flop it directly onto the grill grate. Yes, you read that right. No, it will no longer be in that beautiful round shape. It is ok! Don't sweat it. As long as it is relatively flat it is perfect!

This looked sort of round on the pan,
but by the time it hits the grill it is a bit stretched out!
Wipe off your oily hands, wipe the sweat off your brow, take a swig of whatever you are drinking and high five your good buddy standing by! You did it! Give it a few minutes, then peek underneath. 


Soon it will be a firm, half baked pizza crust. When it is lightly browned use your tongs, a spatula or your bare hands and flip it over.

Starting to look good, isn't it?
Here's where the organization pays off. You need to work quickly. 

  • spread on the sauce
  • add the veggies
  • sprinkle the cheese
  • close up the grill and let it bake

Still needs a few more veggies and some cheese,
 but the bottom is baking, so work quickly.
Once pizza number one is cheesed and is baking, flatten the other half of the dough and add it to the grill. About the time one pizza is done the second can be flipped and finished. 

No two pizzas are alike.

Once the cheese is bubbly and the bottom is browned you can move it to the pizza pan, cut it, and eat it!


Kick Back and Enjoy!

Time to eat! Bring out some good summer foods and whatever beverages you like. Sit around the table, inside or out. Enjoy this delicious food with people you love. What a wonderful world!


You can experiment with some delicious flavor combinations. I made a new one the other night. I skipped the sauce and brushed on olive oil instead. I added chopped sundried tomatoes, black olives, red onions, fresh basil, and a little garlic, then feta and mozzarella. Oh, baby! That was yummy. We ate it first and called it appetizer pizza. 

I have some ideas for dessert pizza, too, but I haven't yet tried them. How about a little cream cheese and some strawberries and peaches?? I will let you know soon.

In the meantime, have fun and play with your food!  

Monday, June 10, 2013

Rhubarb Cake

One of the delights of retirement is enjoying the wonders of springtime. While I was teaching, the month of May was always so hectic that I missed some great things. Some years the lilacs bloomed and the asparagus went to seed before I even realized I had missed it! This year I have missed none of it!

I have used the asparagus and the rhubarb more than any other year. Sam would have loved it. 

Earlier this year I went on a hunt for a rhubarb cake recipe and found one that had wonderful possibilities. After doing some fine tuning and tweaking I was ready to serve it to guests. 

And Here It Is . . .


And Here's The Recipe . . .

Rhubarb Cake

for topping:
3/4 c. sugar
1/4 c. all-purpose flour
1/4 c. cold butter

for cake:
1 cup sugar
1 tsp. baking soda
1/2 tsp. salt
2 c. all-purpose flour
2 eggs, beaten
1 c. sour cream
3 c. rhubarb


Preheat oven to 350 degrees and grease and flour a 9" x 13" pan.

Prepare topping by mixing flour and sugar in a small bowl. Cut the cold butter into 6-8 pieces and mix into the flour and sugar mixture with your fingers. Rub the butter between thumb and fingers. Work the sugar/flour mixture into butter until it is a crumbly mixture. Set aside.

Sift the dry ingredients into a large mixing bowl. Beat the eggs in a smaller bowl and mix in the sour cream. Add the egg mixture to the dry ingredients. Stir together gently and when nearly combined add rhubarb and stir to combine. Spread into prepared pan. Sprinkle on the topping and bake in center of oven for 45 minutes or until a toothpick inserted into the center of the cake comes out clean. 

Cool on cooling rack. Serve slightly warm or cool. 

And To Make It Even Better . . .


Serve it with some ice cream! I found some Strawberry-Rhubarb ice cream that finishes this off perfectly. I think vanilla would be mighty tasty, but if you can find the Strawberry-Rhubarb, you won't be sorry. You will likely be scraping every little crumb and drop out of your dish! 

I have been tempted to add some cinnamon to the topping, but it is so good this way that I haven't done it. Maybe, next time.

I hope you enjoy this little taste of springtime as much as I do. 


Tuesday, June 4, 2013

Black Bean Burger

Oh, I love a good hamburger, pork burger, turkey burger, just about any kind of burger, so why not try a black bean burger. Turns out they are quite tasty and loaded with fiber and protein while being extremely low in fat. Over the past couple of years I have eaten these in various eateries. Some have been better than others, but I have not made them at home. Until last evening . . .

One of my nieces is staying at Mrs. Clark's Home Style B and B this summer. Hannah and I  have a lot in common and discovered that among our commonalities is an enjoyment of said Black Bean Burger! Right then and there we made one of our summer projects the development of the perfect BBB. Game on!

The Adventure Begins . . .

As we watched the Cooking channel on TV, Hannah and I found ourselves both on an internet hunt for that perfect burger. I think Hannah's go-to food site is foodgawker.com while mine is allrecipes.com. One is a photo gallery of food and the other is a recipe data base. Of course both sites are a doorway to much much more! We both found examples of burgers made with black beans and quinoa. Oh, there is so much to try and to learn!

It turns out that our first black bean burger might have also been our last recipe to try. It was so good, that I can't imagine experimenting further! 


This is the Black Bean Burger I had for lunch today and here is the link to the recipe I used. click here for recipe  It is actually a Quinoa and Black Bean Burger.

I used this recipe exactly as written except I only used about half the hot sauce (I was a tiny bit chicken) and I used less oil to cook the burgers.  

I followed the directions and these were easy to make. 

If you haven't used quinoa, don't be scared. It is pronounced keen-wa, and it is a very nutritious grain. You can buy it at our local grocery stores along side the rice and beans. It cooks pretty much like rice, but has a little different texture and more vitamins, minerals, and fiber than white rice. 

Chop up the veggies into tiny bits so they incorporate into the mixture and beat the egg before adding it. I used just below medium heat to cook.

We served the burgers with a green lettuce leaf and a slice of tomato. I also added a squiggle of ketchup. Use whatever you like on your burger. Last night we had our burgers along with roasted asparagus and today I had one with thin sliced peppers, onions, mushrooms and bits of tomato cooked in a tiny bit of oil and seasoned with salt and pepper. Delicious both times.

Just turned, now cooking on the second side
I used a scant tablespoon of oil to cook these three burgers and about the same amount to cook the next two. The cooked burgers kept well in the fridge and were easy to reheat on the George Foreman grill or in the microwave. 

What's next?

I have no idea! Since we found this great burger so easily, Hannah and I will be on the hunt for the best of something else. Stay tuned!